How to Create a Floor Plan
Everything you want to know about creating a floor plan in Concepts.
Whether you’re creating a floor plan from an existing plan or from scratch, Concepts lets you import or draw a plan to any scale, make mark-ups and edits, duplicate drawings or layers for quick plan iterations, and export flexibly for clients and other apps. You can also use Concepts’ precision tools and measurement features to help you find real-life measurements and detail design-plan specifications.
Creating a Plan from a PDF or Image
If you’re looking to import a plan to make edits or draw over the top, you may want to set the plan to scale so you can pen in real-world dimensions and get an accurate view of your space. Here is how to import a plan, set it to scale, and use Concepts' tools to update the design.
1. Import Your PDF or Image
You can create a plan from any PDF, satellite image or accurate photograph.
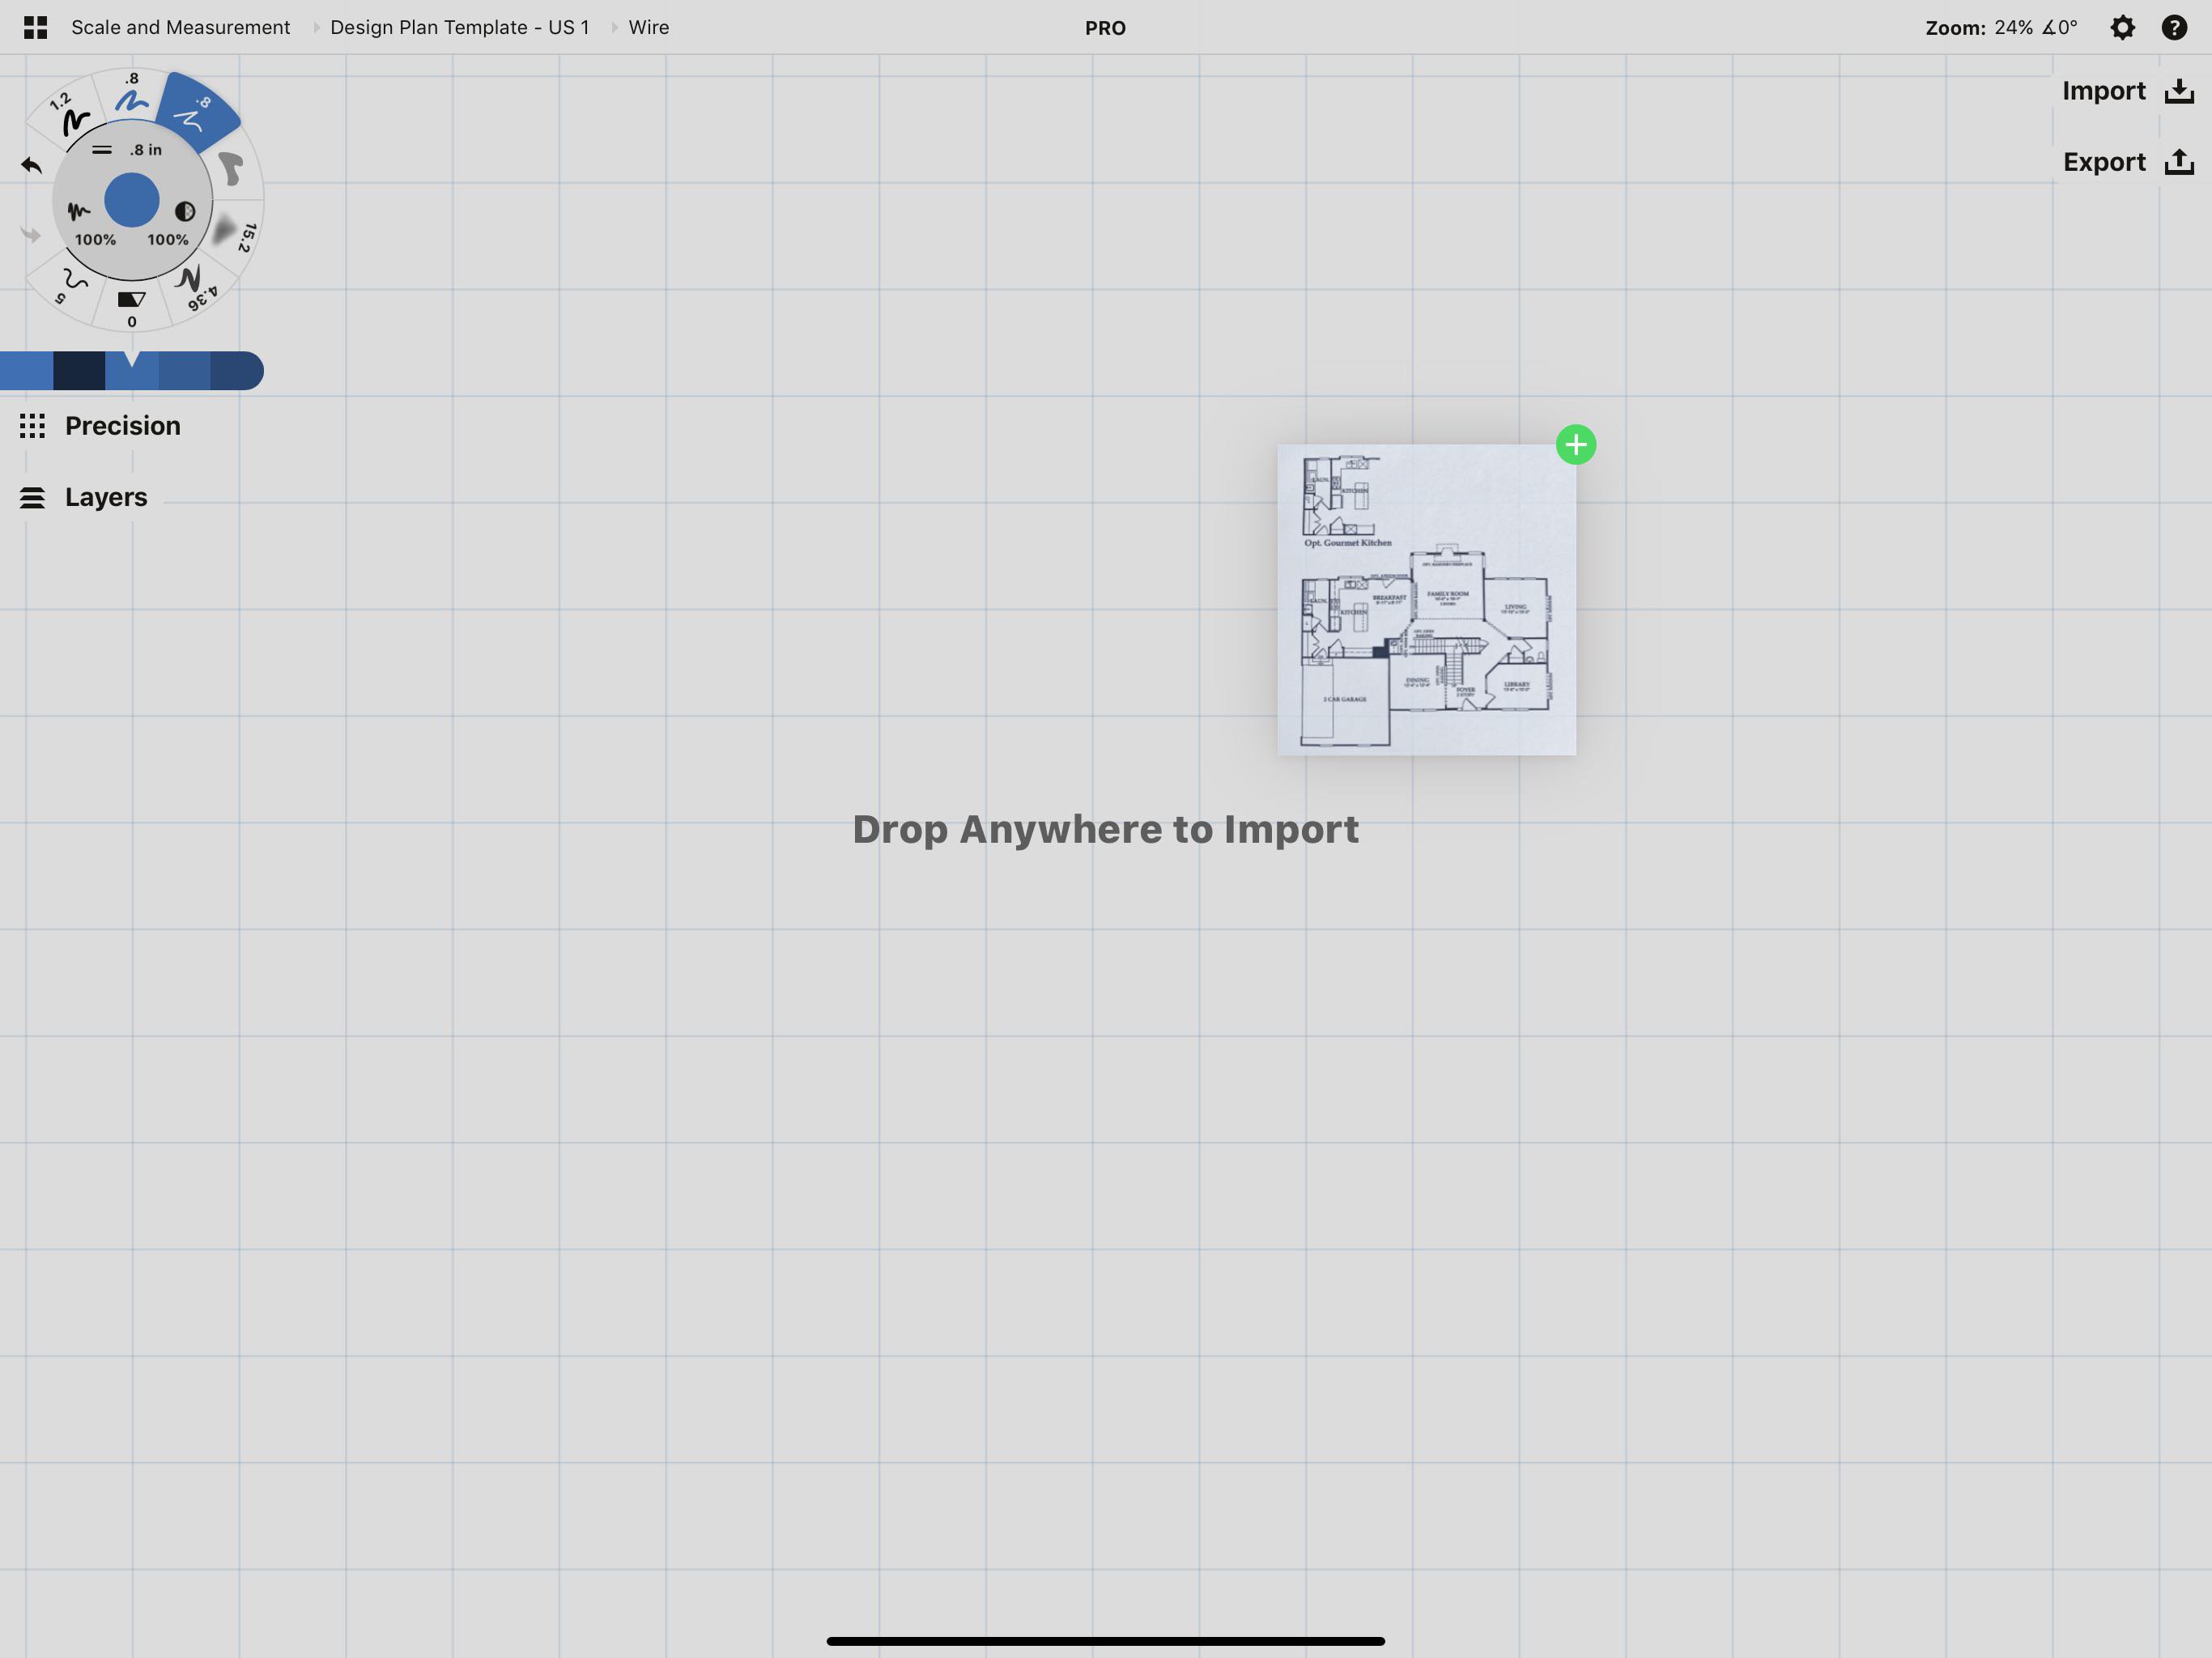
Drag+drop the file onto the canvas, or double-tap the Import button on canvas as a shortcut to the Imports menu. Choose your file, size it comfortably and tap to set it in place on the canvas.
If you’re working with a multi-page PDF, import the file and its pages will appear on the side of the screen. You can scroll through and drag one in.
Tap+hold+drag files in supported apps, then open Concepts to import them onto your canvas.
2. Align Your Drawing Scale to Your Plan
We have an illustrated guide to this here. The short version is:
- Know one real-world measurement on your plan.
- Open the Precision menu and activate Measure.
- Activate the Line guide. (It helps to double-tap the crosshairs to contain the line.)
- Align the guide handles to the segment on your plan that corresponds with your real-world measurement.
- Tap the ratio beside Measure in the Precision menu. Enter your real-world measurement into the second field.
When you exit the overlay, you’ll see the new scale ratio, 1:your-new-calculated-value. From here on out, every line you draw will measure up with the dimensions of the plan you imported.
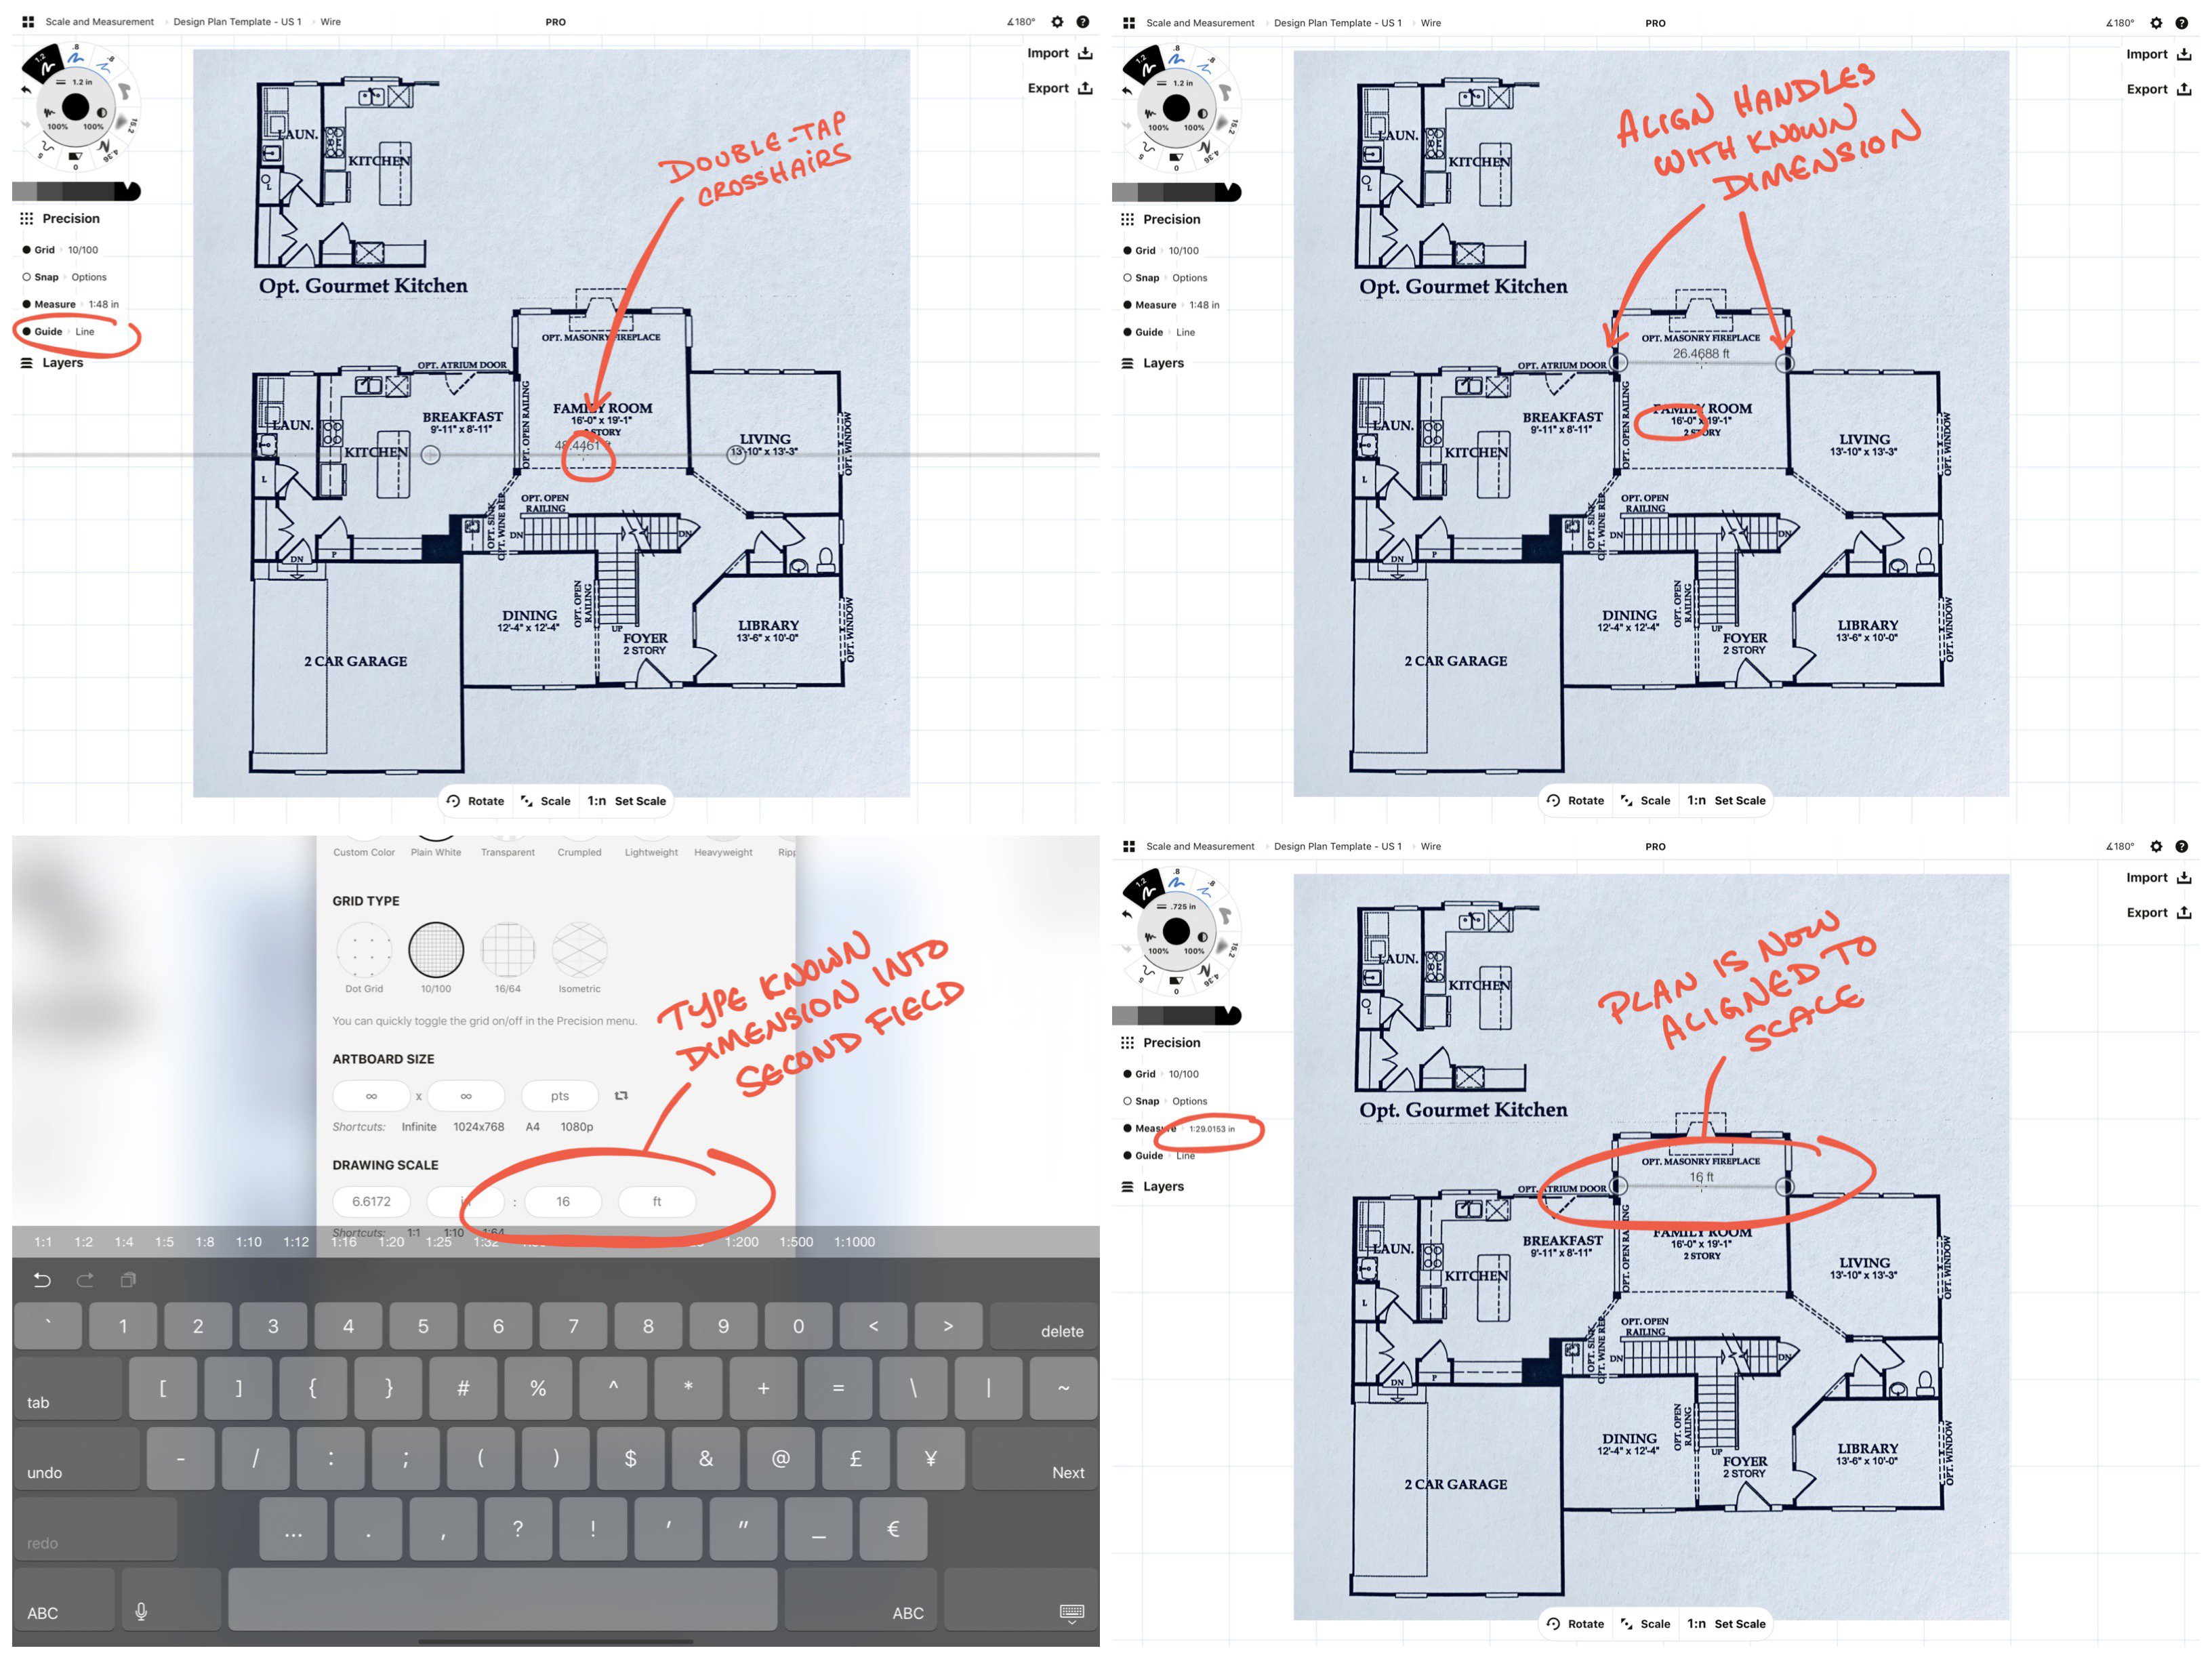
Aligning a drawing scale to your imported plan.
3. Use Layers to Toggle Plan Options
Open the Layers menu and you'll see the plan in its own Image layer. Tap + New Layer to create a layer above it. Use as many layers as you need to trace over your plan, edit the plan, jot notes or engineering specs, or draw area flows or mark-ups. (Learn more about layers and how they can help you organize your work.)
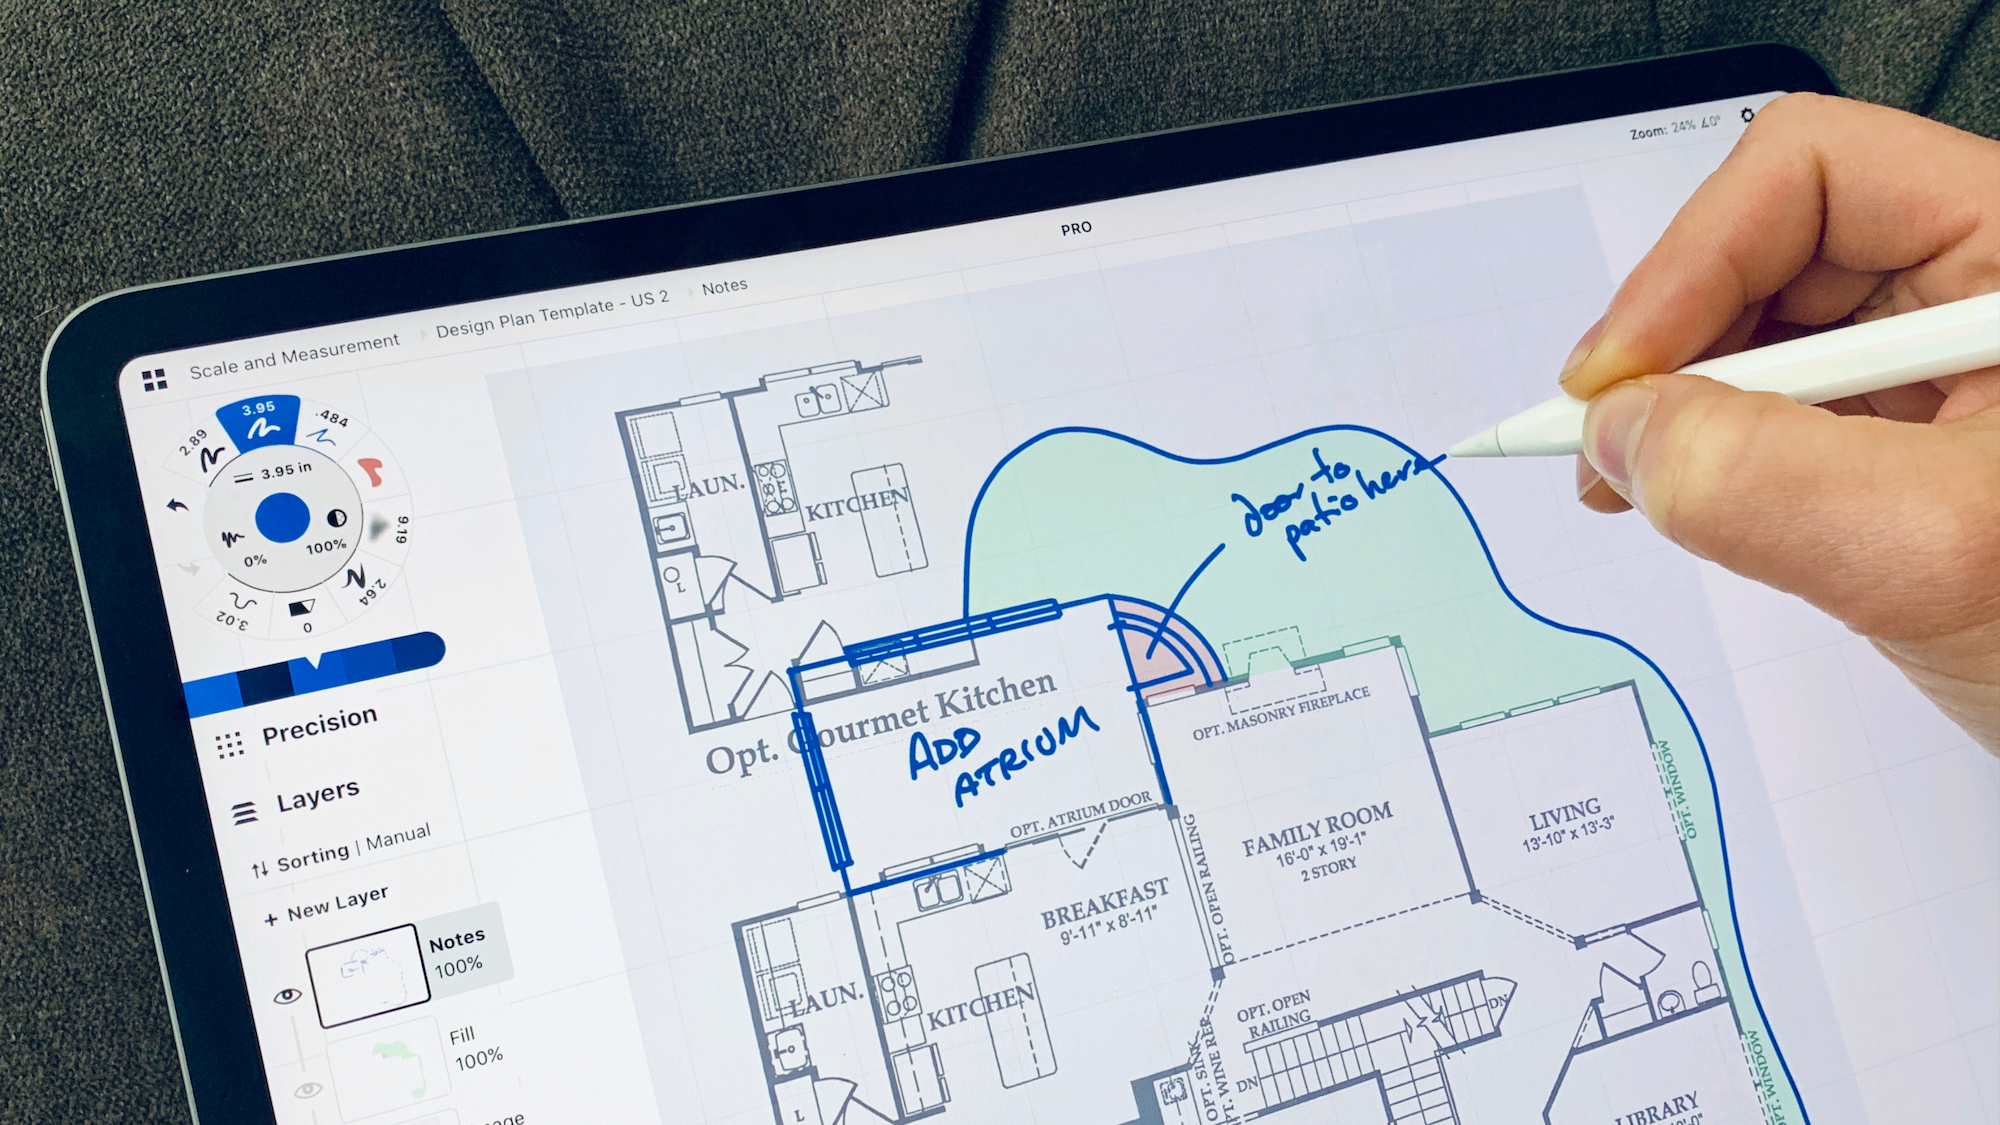
Lowering the opacity of the image layer to around 50% will help you see mark-ups easier. Draw pen in one layer, add fill in a layer below, and make notes on a separate layer. This not only organizes your sketch for easier editing, it lets you focus only on what you want to see at any given time. You can toggle layers on and off to visualize many different plan options in the same drawing. Find great examples of this in our interview with Architect Erick Mikiten, who uses layers to share home flows, layouts and indoor-outdoor living options directly with clients.
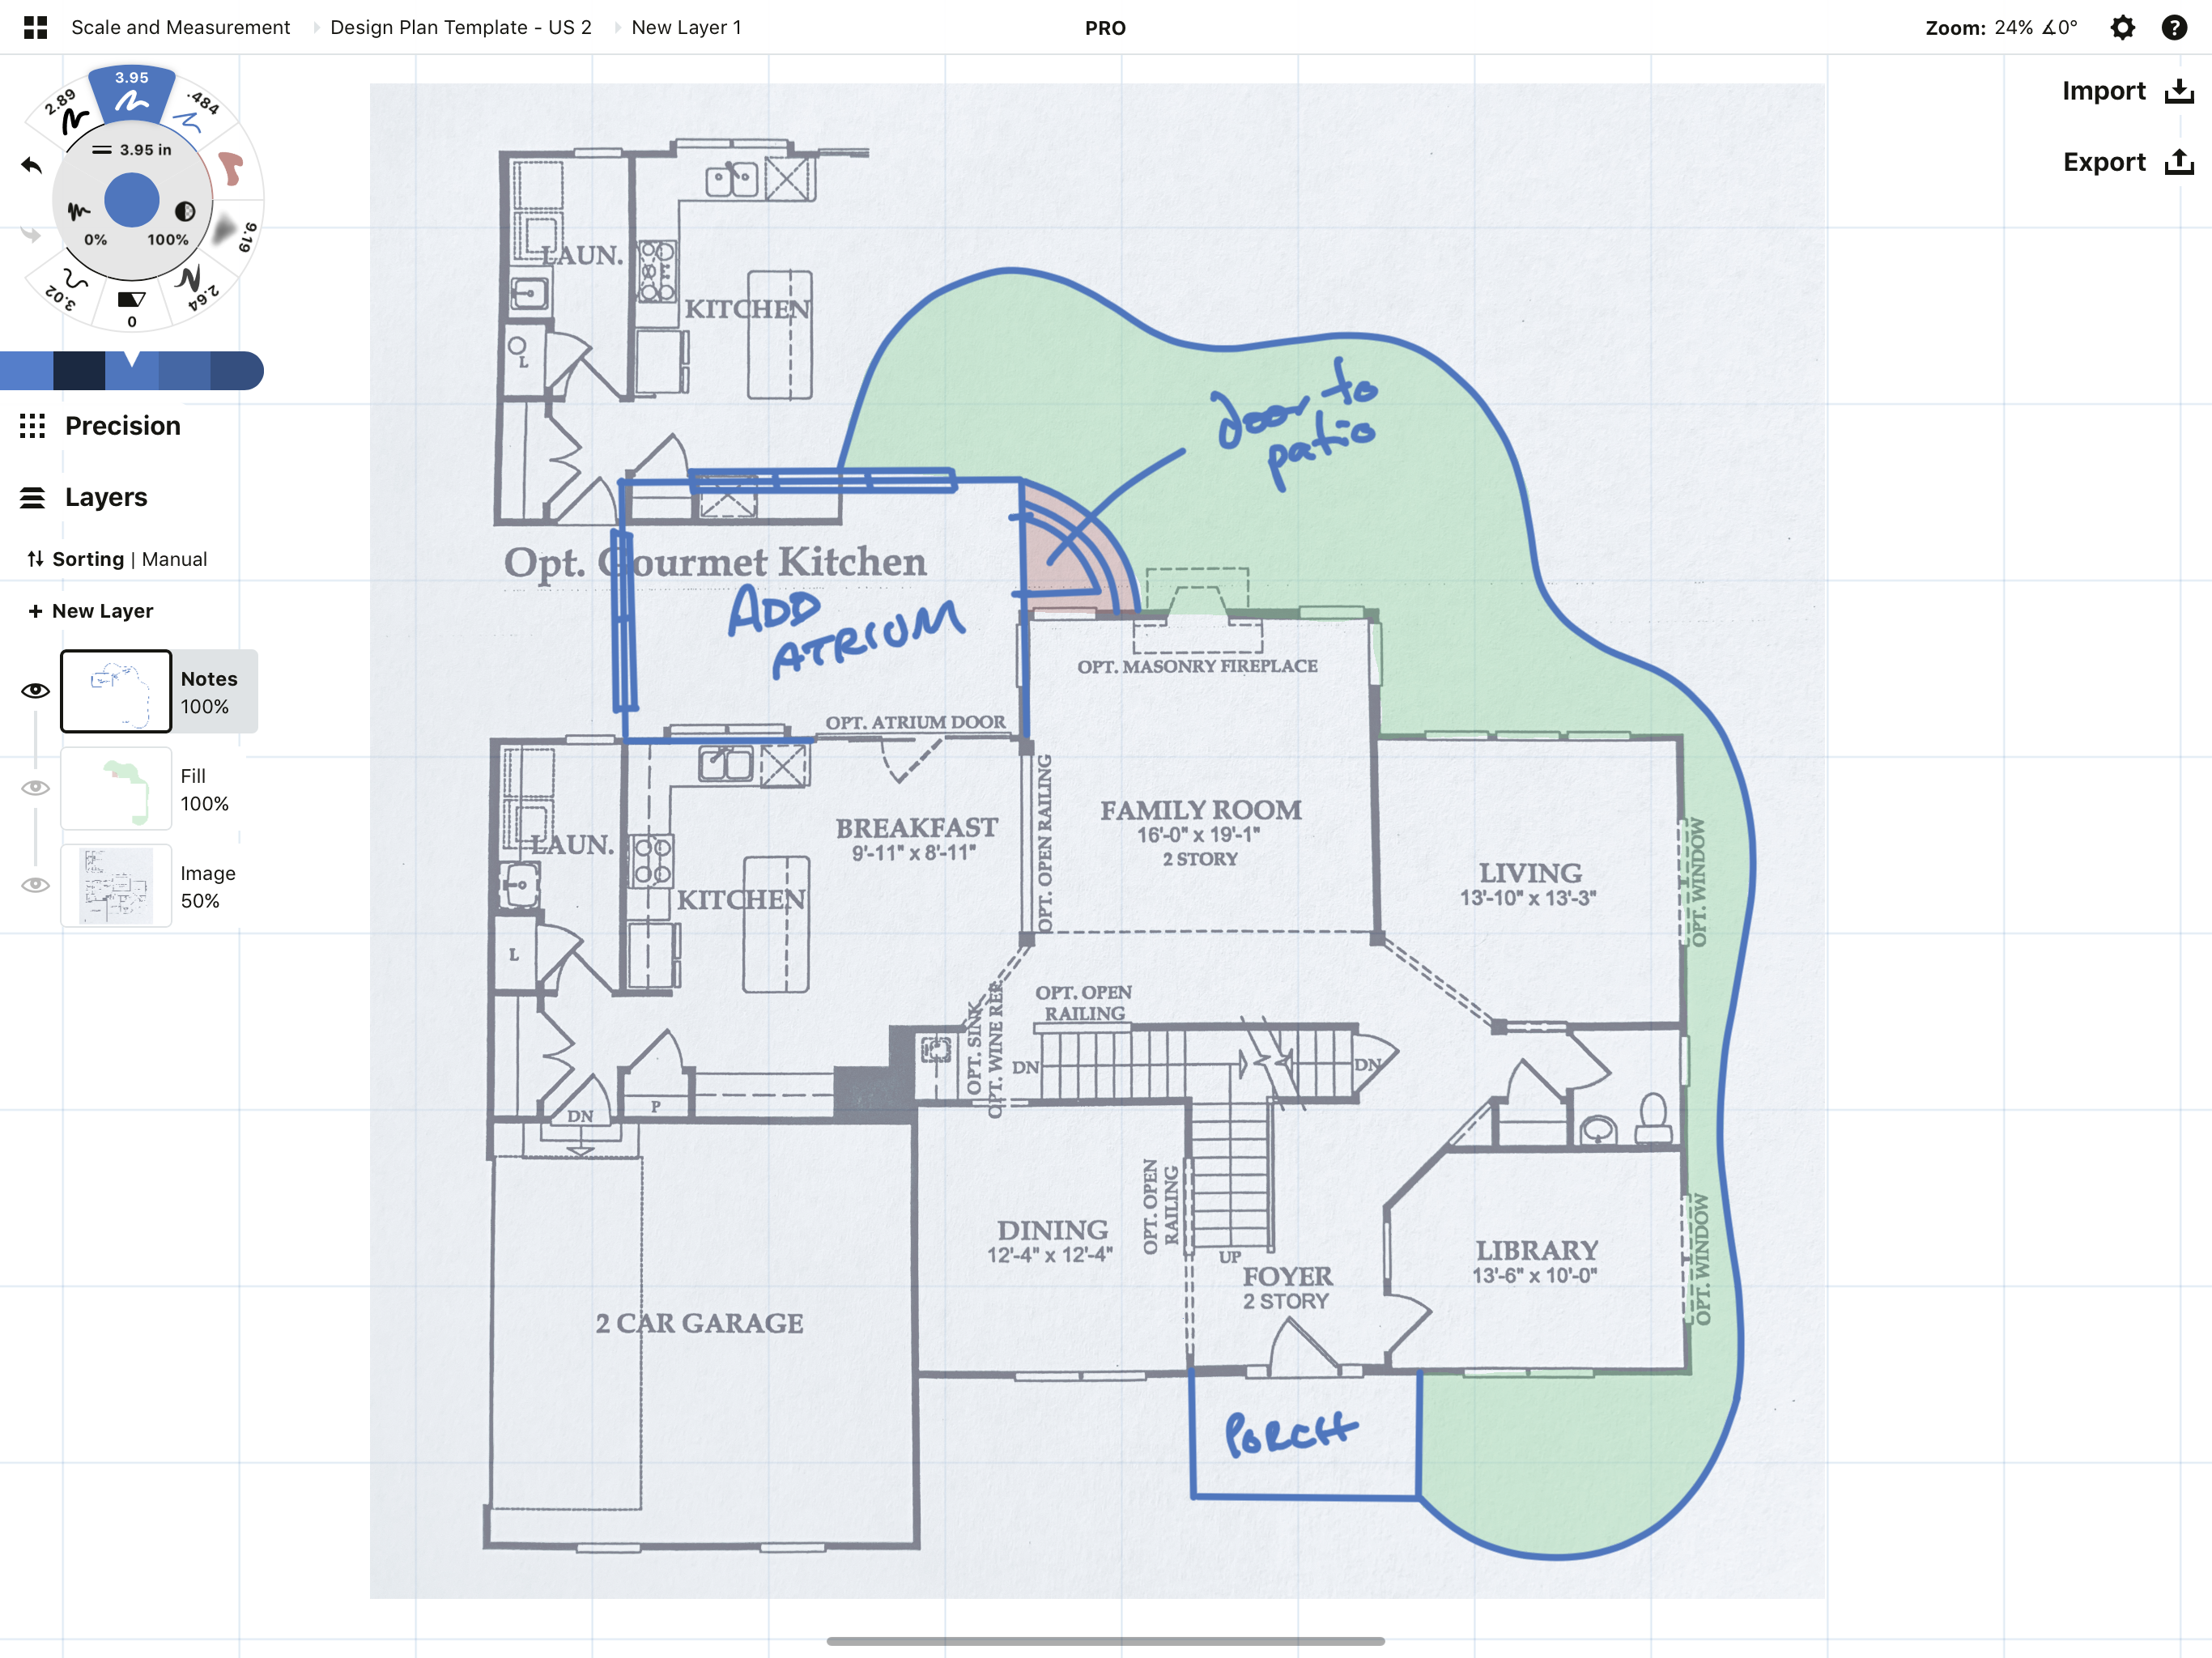
Use layers to add mark-ups or visualize fresh options for your plan.
4. Export the Plan
When you're ready to export, Concepts lets you export as a JPG, high-res PNG or flattened PDF to your files, email or client, or continue vector work in other apps via SVG, DXF, PSD or editable PDF.
Hit the Export tab and choose from among the various file types, background options and resolutions. Then tap Export in the upper corner and save or share it. (Learn tips for exporting your plan here.)
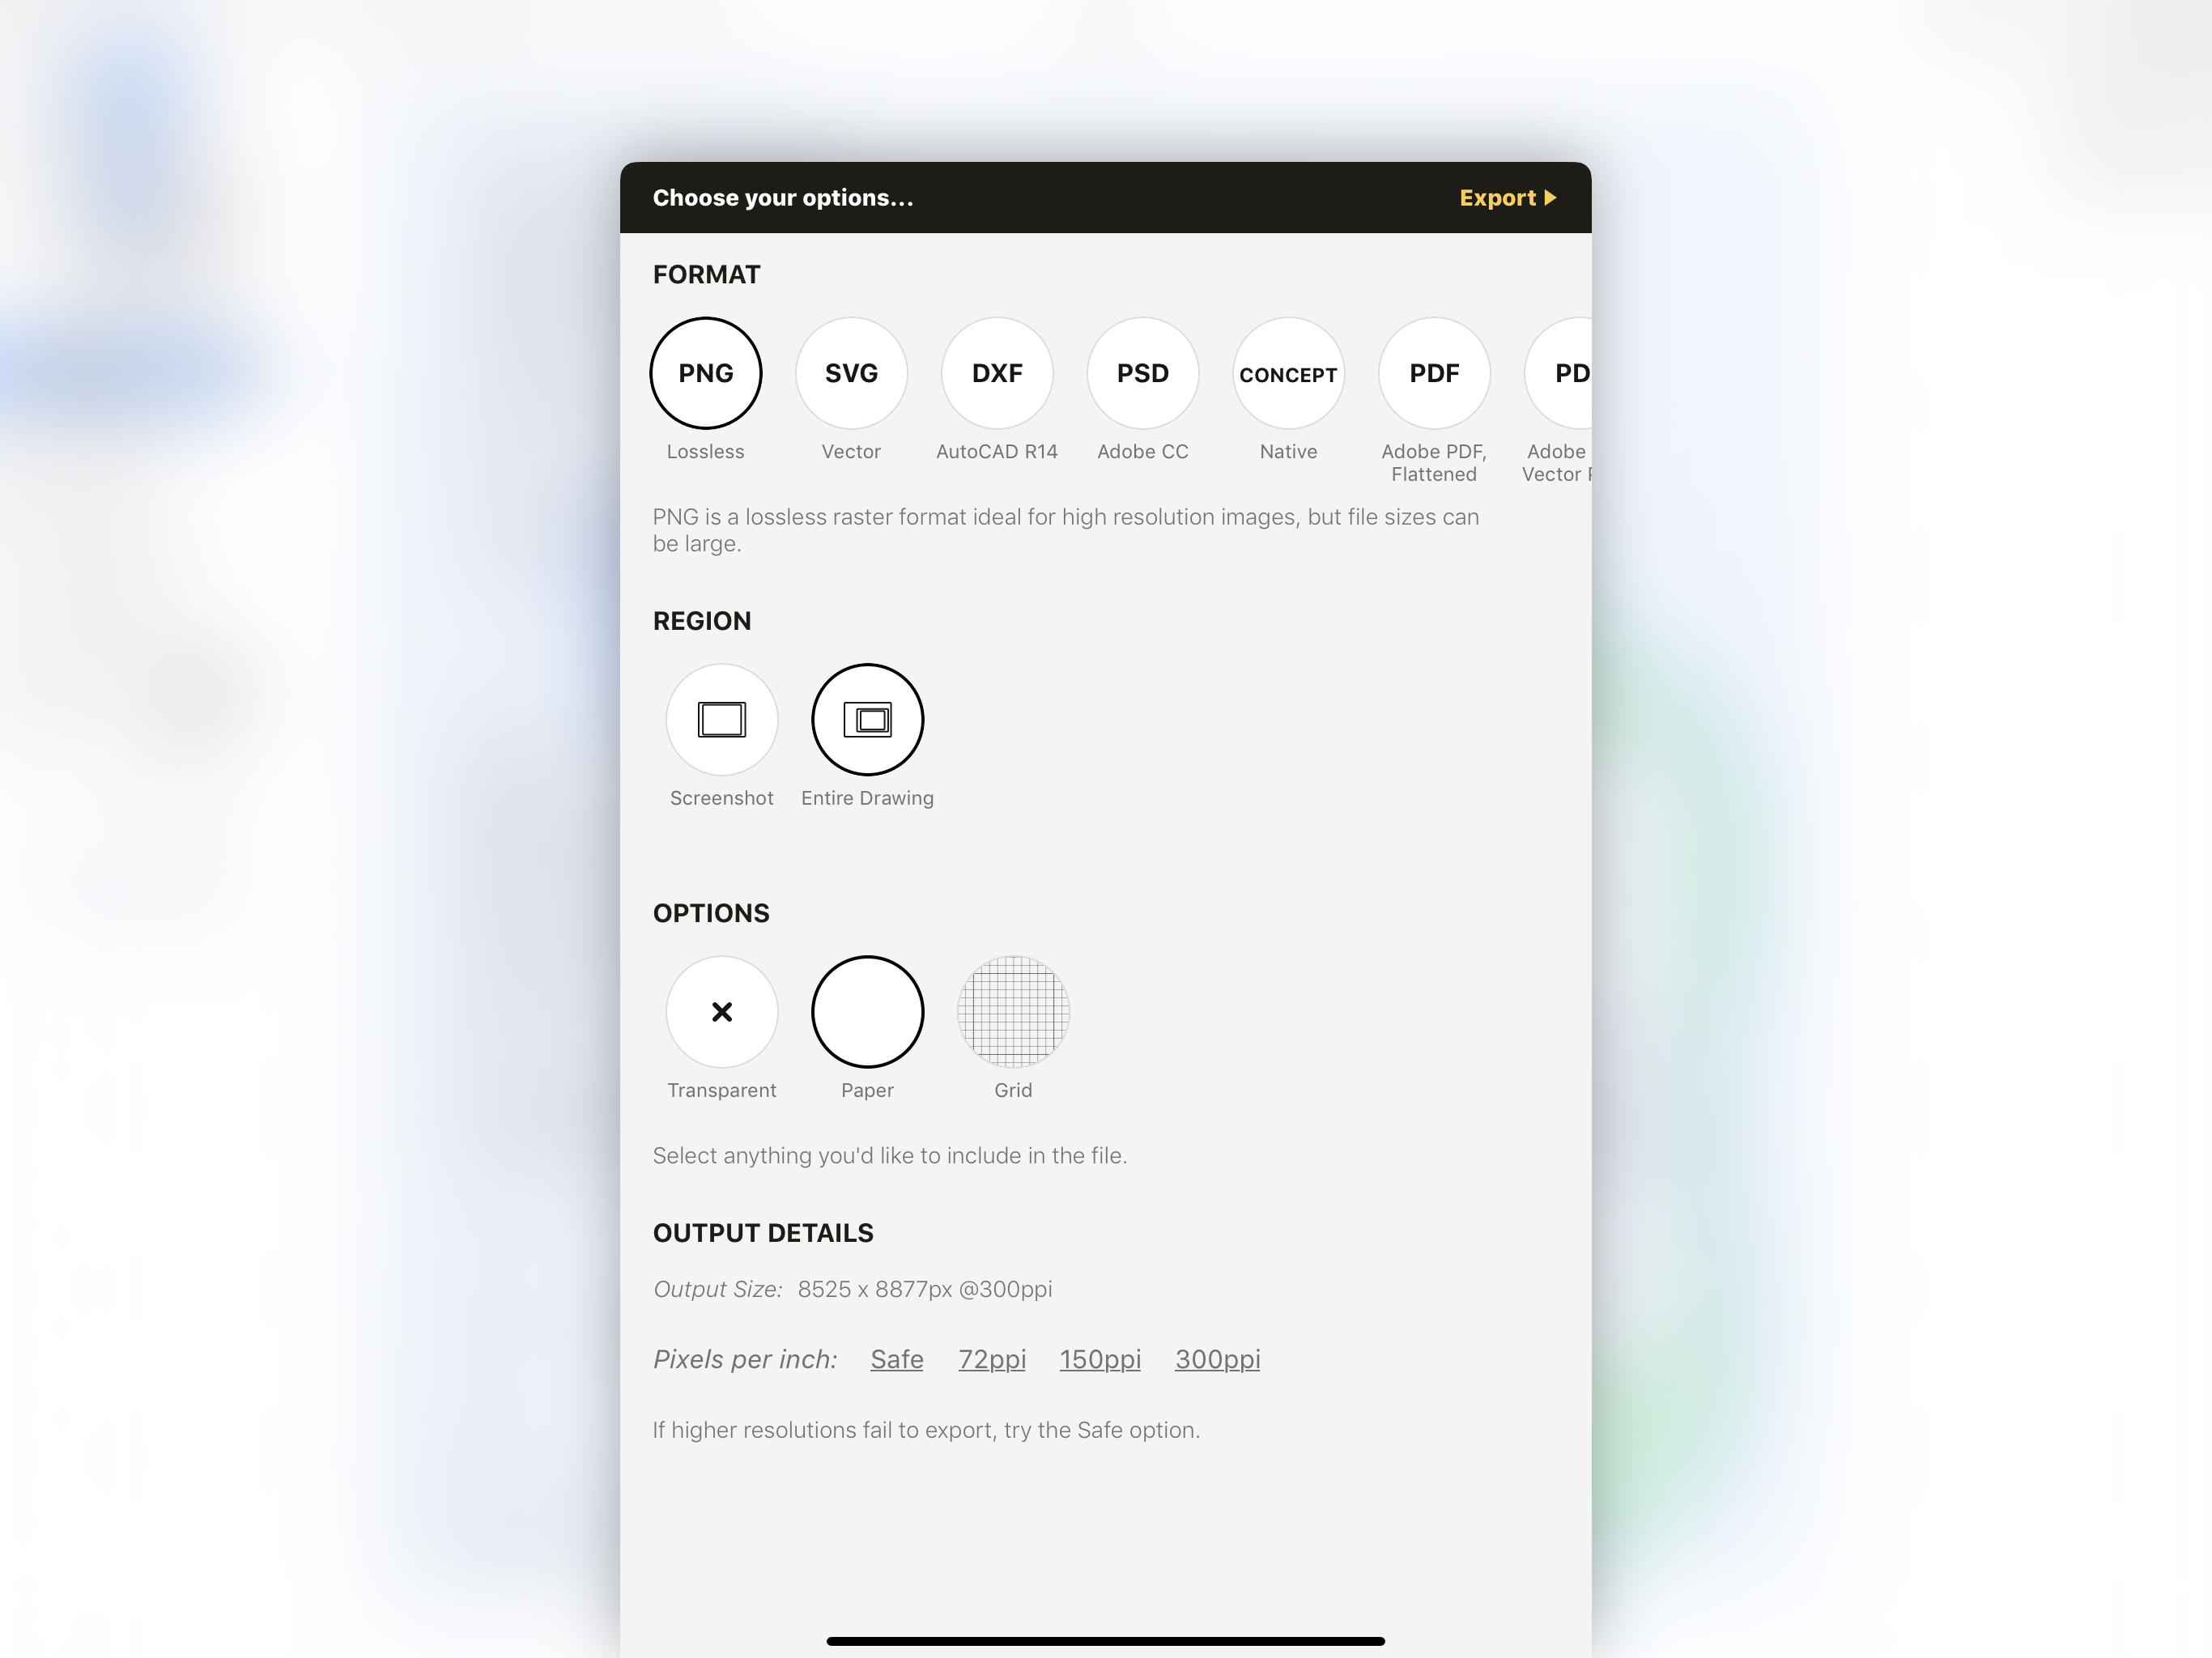
Export to various file types including CAD’s DXF and Adobe’s PDF.
Tip: To make quick edits to a PDF - import the plan, use the hard eraser to mask out the editable portion, and draw or add text or signature over the top. Then export the page. If it’s part of a bigger document, you can substitute the single page into the doc by selecting “PDF bounds” at export.
Drawing a Floor Plan from Scratch
If you’re looking to draw a plan from scratch in Concepts, you’ll want to set your drawing to a real-world scale, draw with straight lines that measure for you, and know how to “stick” those measurements to the canvas.
1. Set your Drawing Scale
In a new drawing, open the Precision menu. Next to the “Measure” option is a ratio. It will probably say 1:1. This ratio is your drawing scale. Tap the ratio to bring up the drawing’s scale settings (you can also find it in the Settings menu, it’s the same menu). Tap a field to bring up the keyboard and find a list of popular scale options, or enter your own.
While you’re here, head to the Units field below and choose the units that correspond with your scale. While the scale will be correct, it might be confusing to have units measured in points or mm instead of inches, for example. From here on out, all tools, objects and measurements will display according to this metric.

Define both your drawing scale and units.
2. Activate Measure
Tap the circle beside the Measure option. Your lines, shapes and distances will now show measurement tags as you draw.
Tap a measurement tag at any time to "stick" it to your canvas. To delete it, select the tag via Item Picker and tap the trash icon.
If Measure is active when you export, the tags will display on your exported plan.
Examples of measurement tags.
Handy Setup Tips
For a quick setup of your workspace and tools, download a project template or make your own with this tutorial. Duplicate the template each time you make a new plan.
If you have a business template or logo you use for printed plans, import it into Concepts on a transparent background and create a blank template drawing.
Find the right grid for your plan in Settings -> Workspace. Choose Dot Grid, 16/64, 10/100 or Isometric.
Use the tool slots to your advantage. Set one pen to 100% smoothing for drawing quick lines, set another at 0% for writing notes. Preset them to other colors for line edits.
Add Slice to the tool wheel for trimming lines and making incisions. Set it to 0 pts to keep your line lengths in tact.
To add text to your plan, use either the text tool or try handwriting notes on the plan.
3. Draw your Plan
You have two ways of drawing straight lines to ideal lengths. 100% line smoothing draws instant straight lines and when paired with Measure, measures as you draw. The Line guide is traceable and lets you set floating measurement tags. Each has slightly different advantages.
Drawing with Line Smoothing
100% line smoothing lets you draw instant straight lines with your stylus.
To set your pen to 100% smoothing, choose a slot on the tool wheel, select a pen and tap the smoothing setting on the inner ring of the tool wheel. Select a preset value in the menu that appears and slide it all the way up to 100%, or tap+hold a preset to custom enter a value.
Set your tool to 100% smoothing and activate Measure.
When Measure is active, it will calculate your line length according to your drawing's scale. This is great for freehand sketching a plan when you don’t know the measurements. Measure calculates the distance for you.
If you need an exact length for your line, you can select the line, then tap+hold the Length value beside the line or in the status bar and enter the custom value.

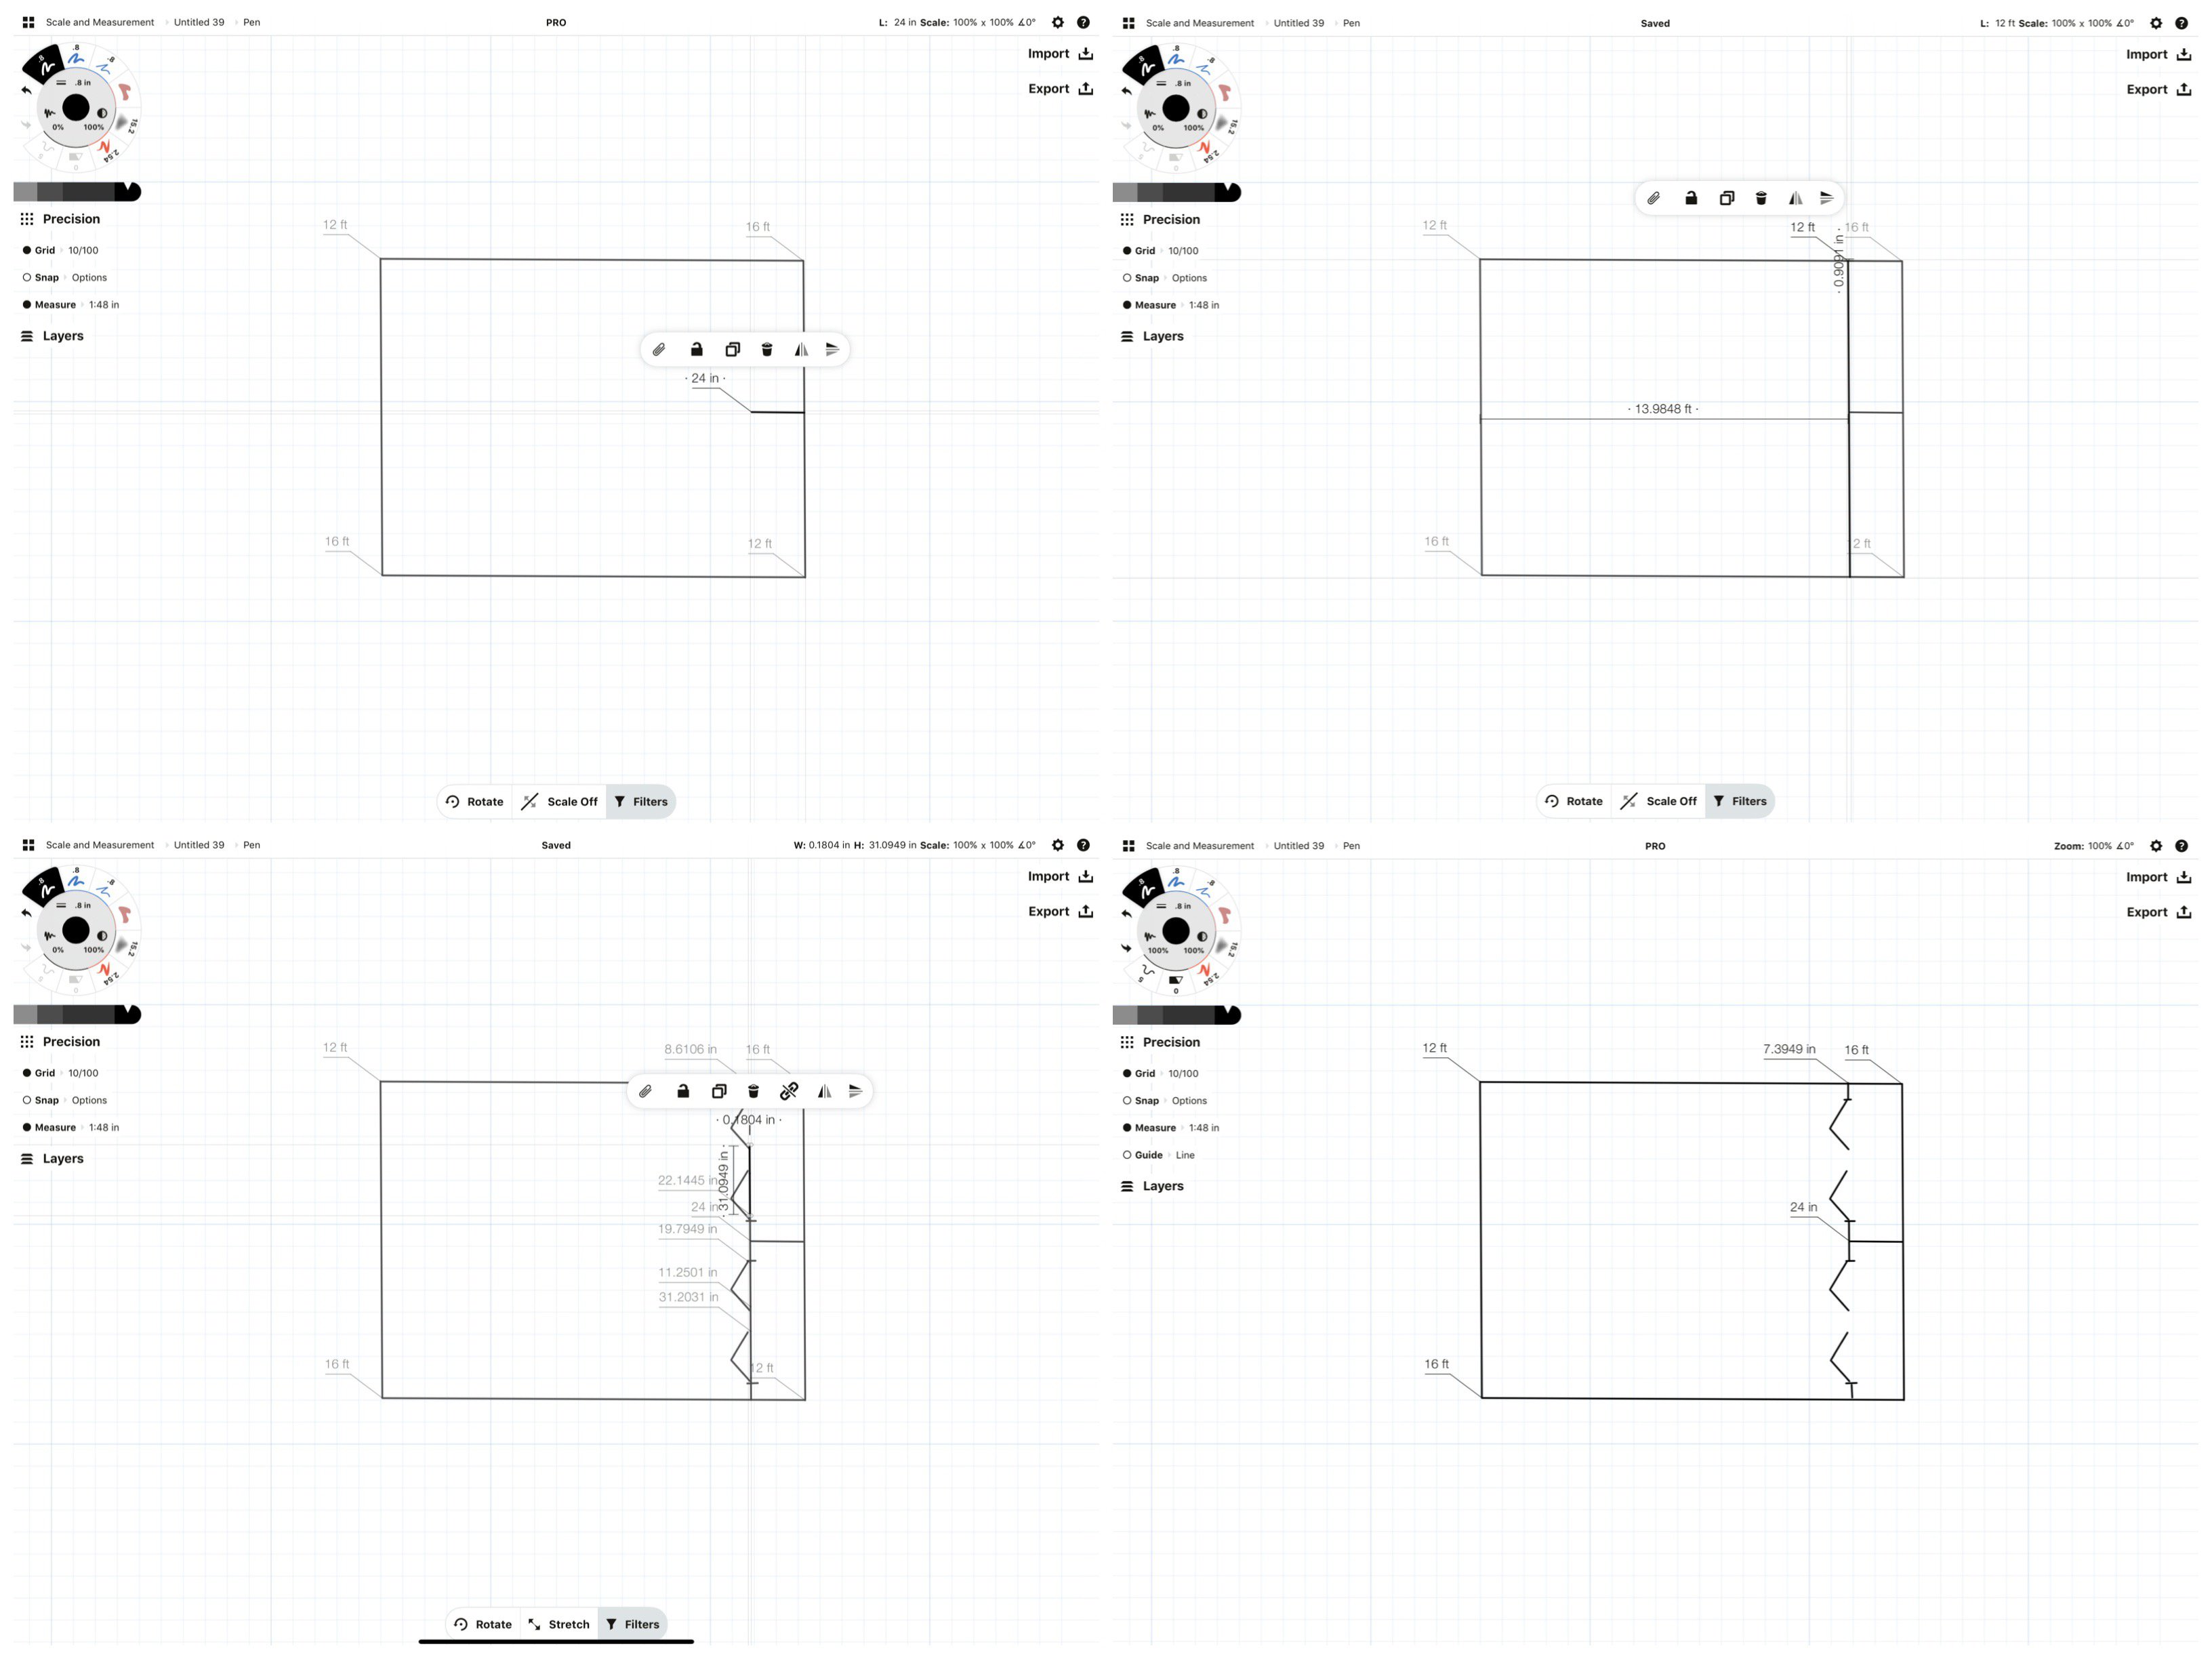
To create a custom line length: 1. Select the line. 2. Tap+hold the length measurement. 3. Type in the exact value. 4. Tap the measurement to “stick” it to the canvas.
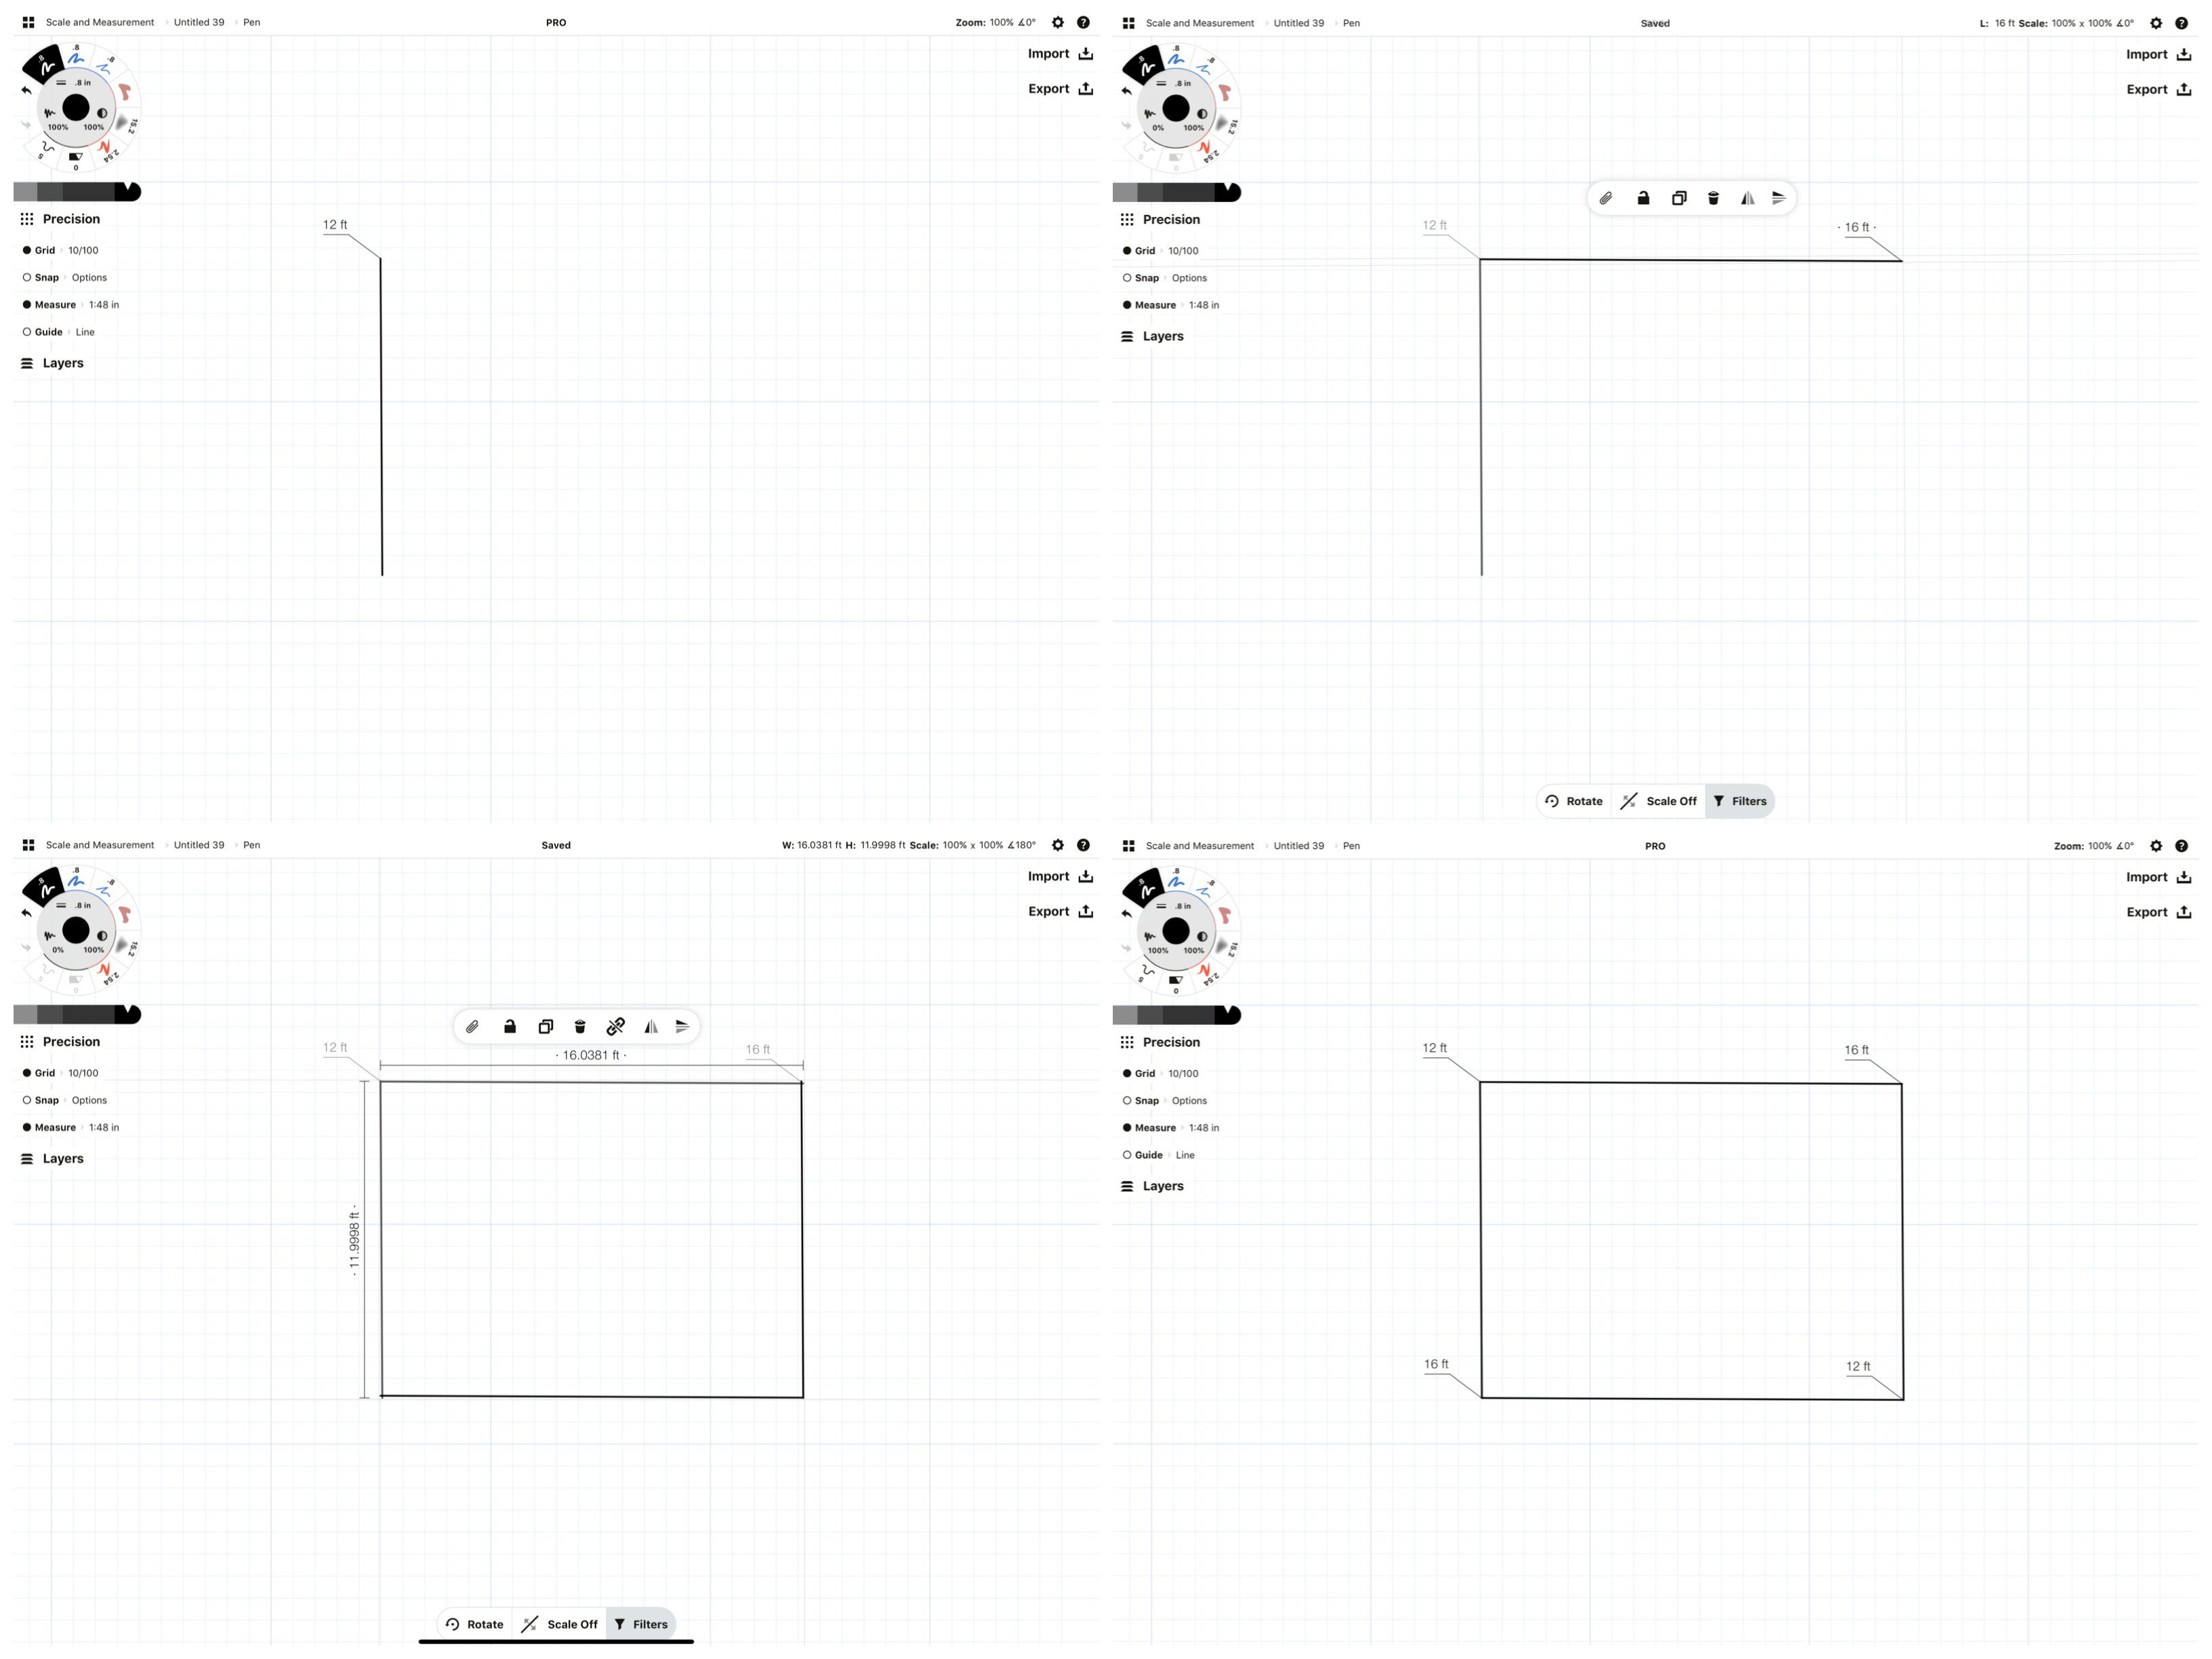
Drawing a plan with line smoothing might look something like this:
Draw a room. Try drawing the first two walls, select and duplicate them, then flip and mirror the duplicate. You’ll see the measurement tags copy over, too.
Measure in closets. A standard closet depth is 24 inches. Measure this distance into the room with a line you can delete later. Draw a closet line to find the wall-to-wall distance. Use the Slice tool at 0 pts to trim out the “wall” and add doors. (Learn about Slice vs Hard and Soft Erasers.)
While new measurement tags will pop up while you slice, showing you the edited dimensions, only the tags you tap into place will remain.
Add other room elements. Know the physical dimensions of what you’re designing. A standard room door in the US is 32”, a single window might be 30”. Planning these in accurately makes a difference both visually on paper and when you build the plan.
If doors, windows, layouts or appliances are "objects" you use frequently throughout designs, draw one and group the lines into a single object, then drag it into an object library for quick access as you draw. Objects are available between drawings and will appear at the size and scale you entered them. (Learn how to create object libraries.)

Group lines into objects by selecting and linking them together, then drag them to an object library for later use.
If you need to rotate a line an exact number of degrees (for example, 90 degrees to form a corner), select the line, then tap+hold the angle value up in the status bar and choose from the shortcuts or enter your own.
Drawing with the Line Guide
The Shape Guides have some special properties that can help when creating designs. Not only are they mouldable via the guide handles, you can define perimeter, angle and radius, then trace the exact shape. You can learn more about the various guides in the manual.
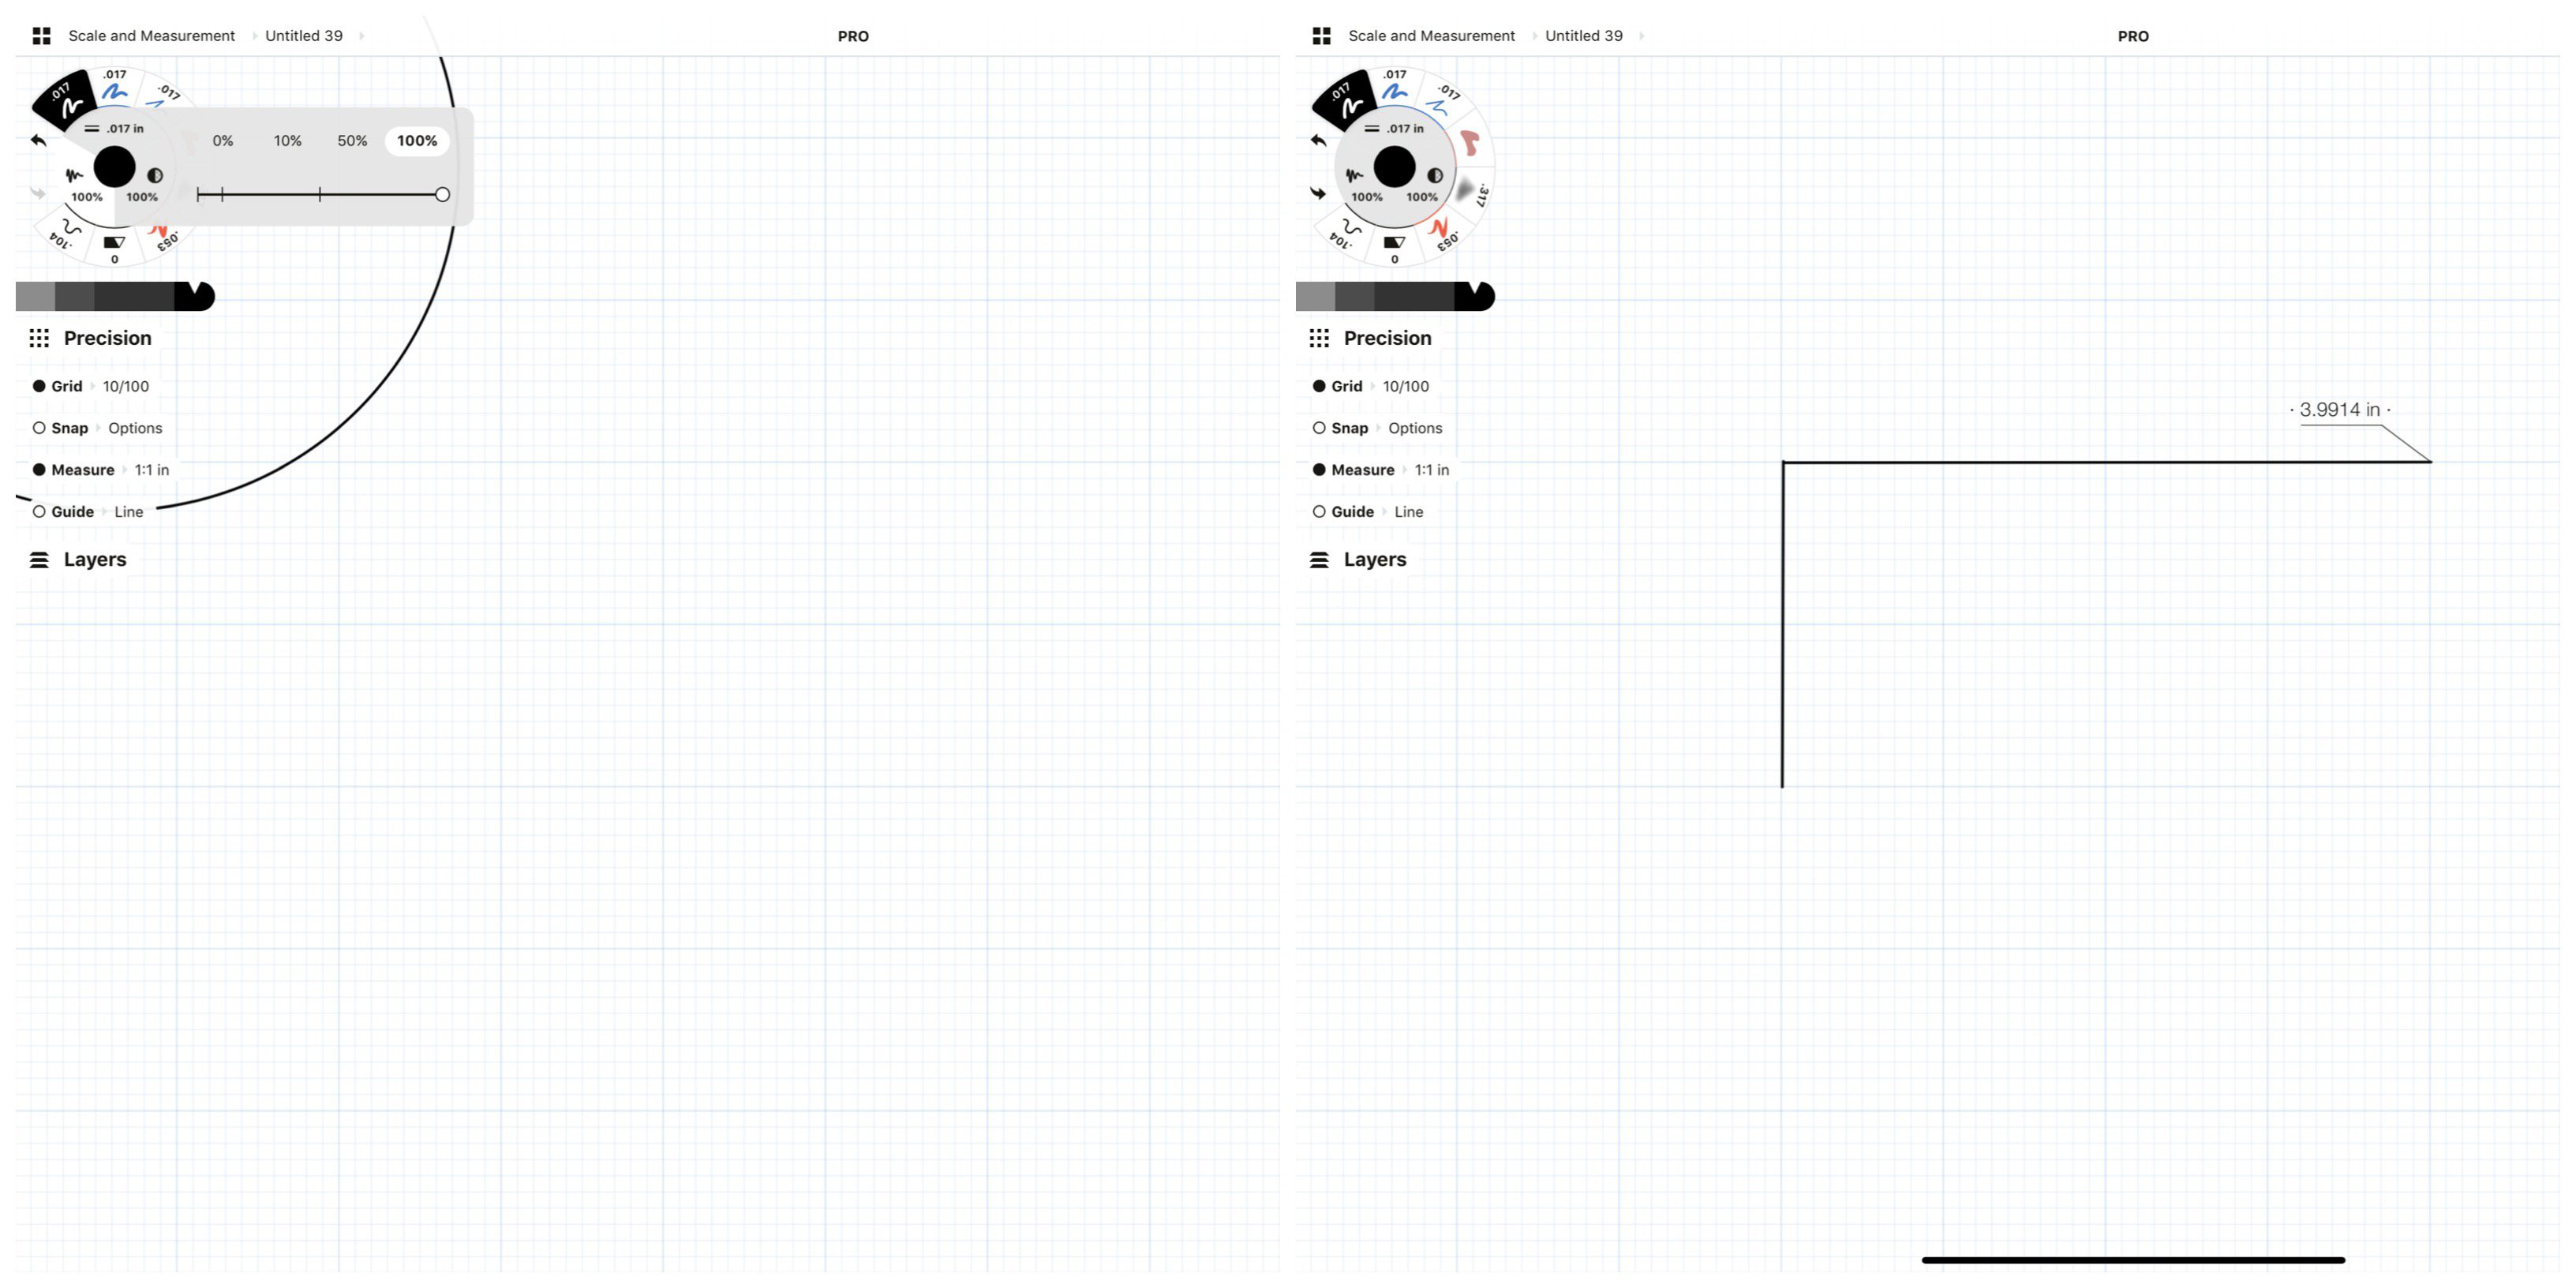
The Line guide paired with Measure lets you draw to scale similar to drawing with smoothing, and also lets you create measurement tags typical to what you might see on a plan.
Activate the Line guide in the Precision menu (if you have something selected, the Guide option won’t show up, so deselect to find it). Then double-tap the crosshairs at the center of the guide to contain your line within the handles. These handles reflect the outer bounds of your measurement, and if you’re going to the work of setting an exact distance, you don’t want to draw beyond it.

Be aware that when the Line guide is active, nothing else is. You can draw anywhere on the screen and it will only trace the guide. You can move the guide, move its handles or tap a tag, but to select, draw or do anything else on the canvas, you need to deactivate the guide first. Do this by tapping the guide option in the Precision menu or just by tapping a finger on the screen. Tap two fingers to bring it back.
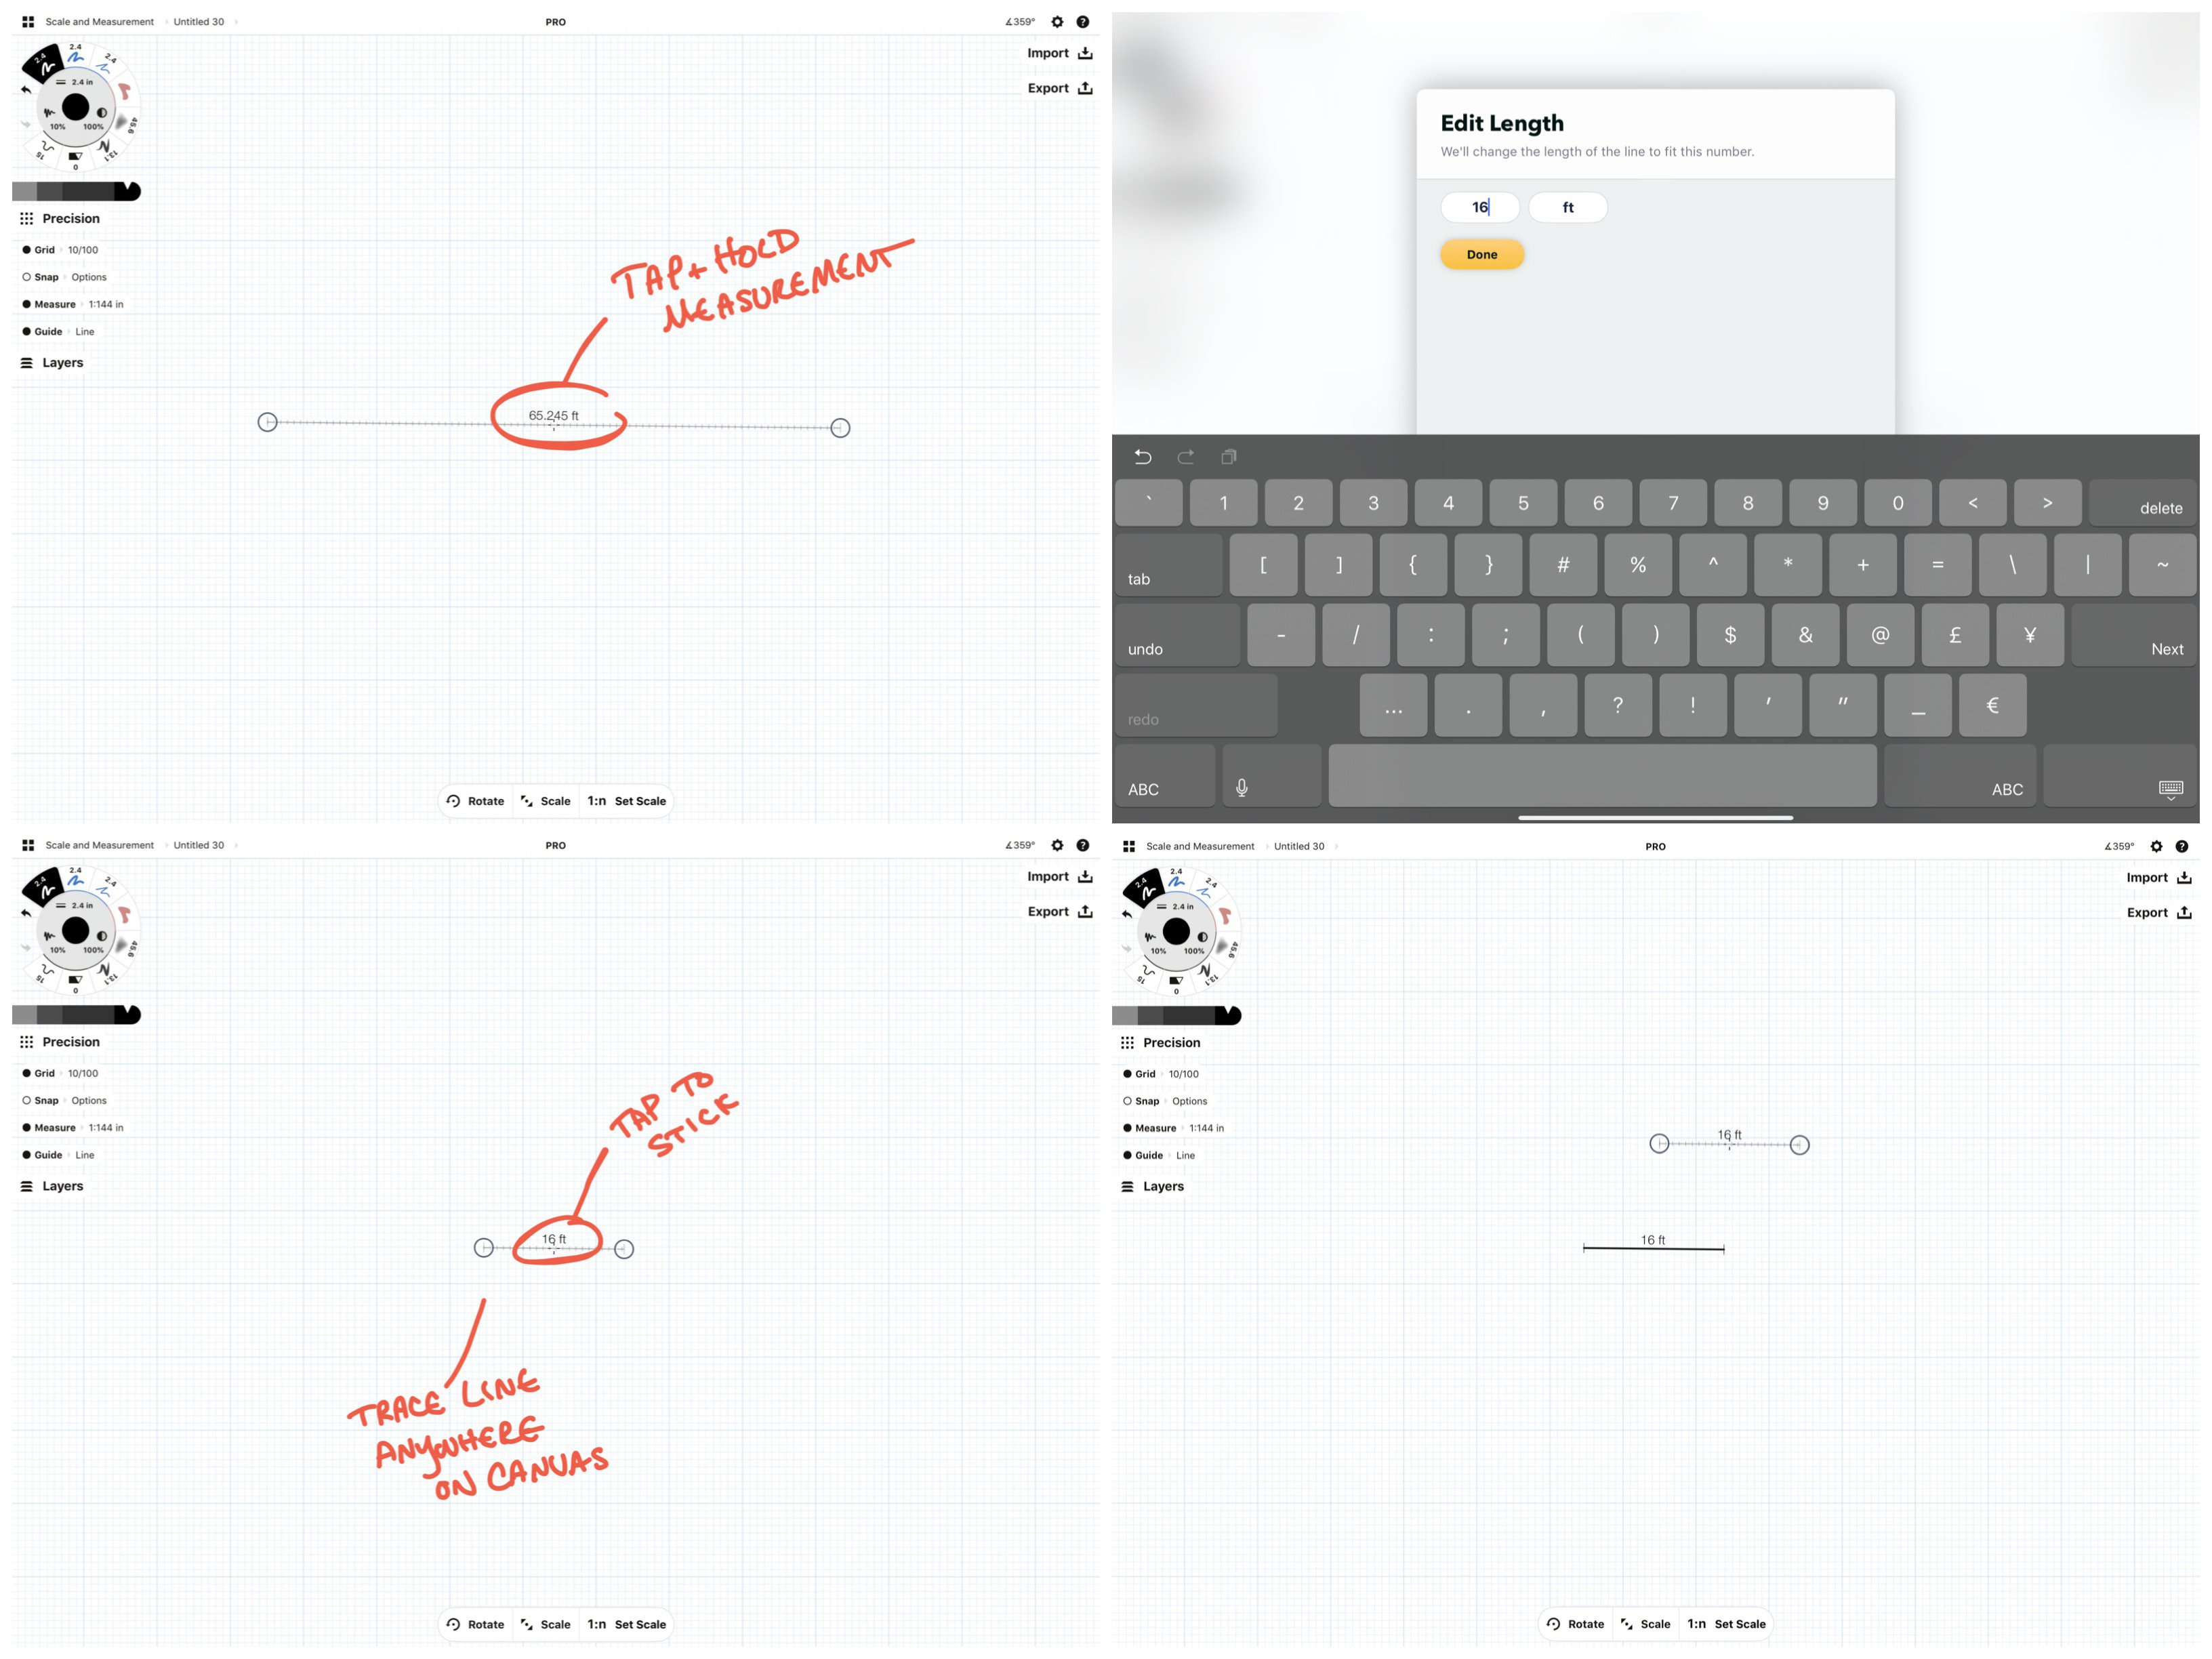
Your process for drawing with the Line guide will look like this:
- Position the Line guide on the canvas.
- Tap+hold the measurement tag.
- Enter your value and hit done.
- Tap the tag.
- Trace the line.
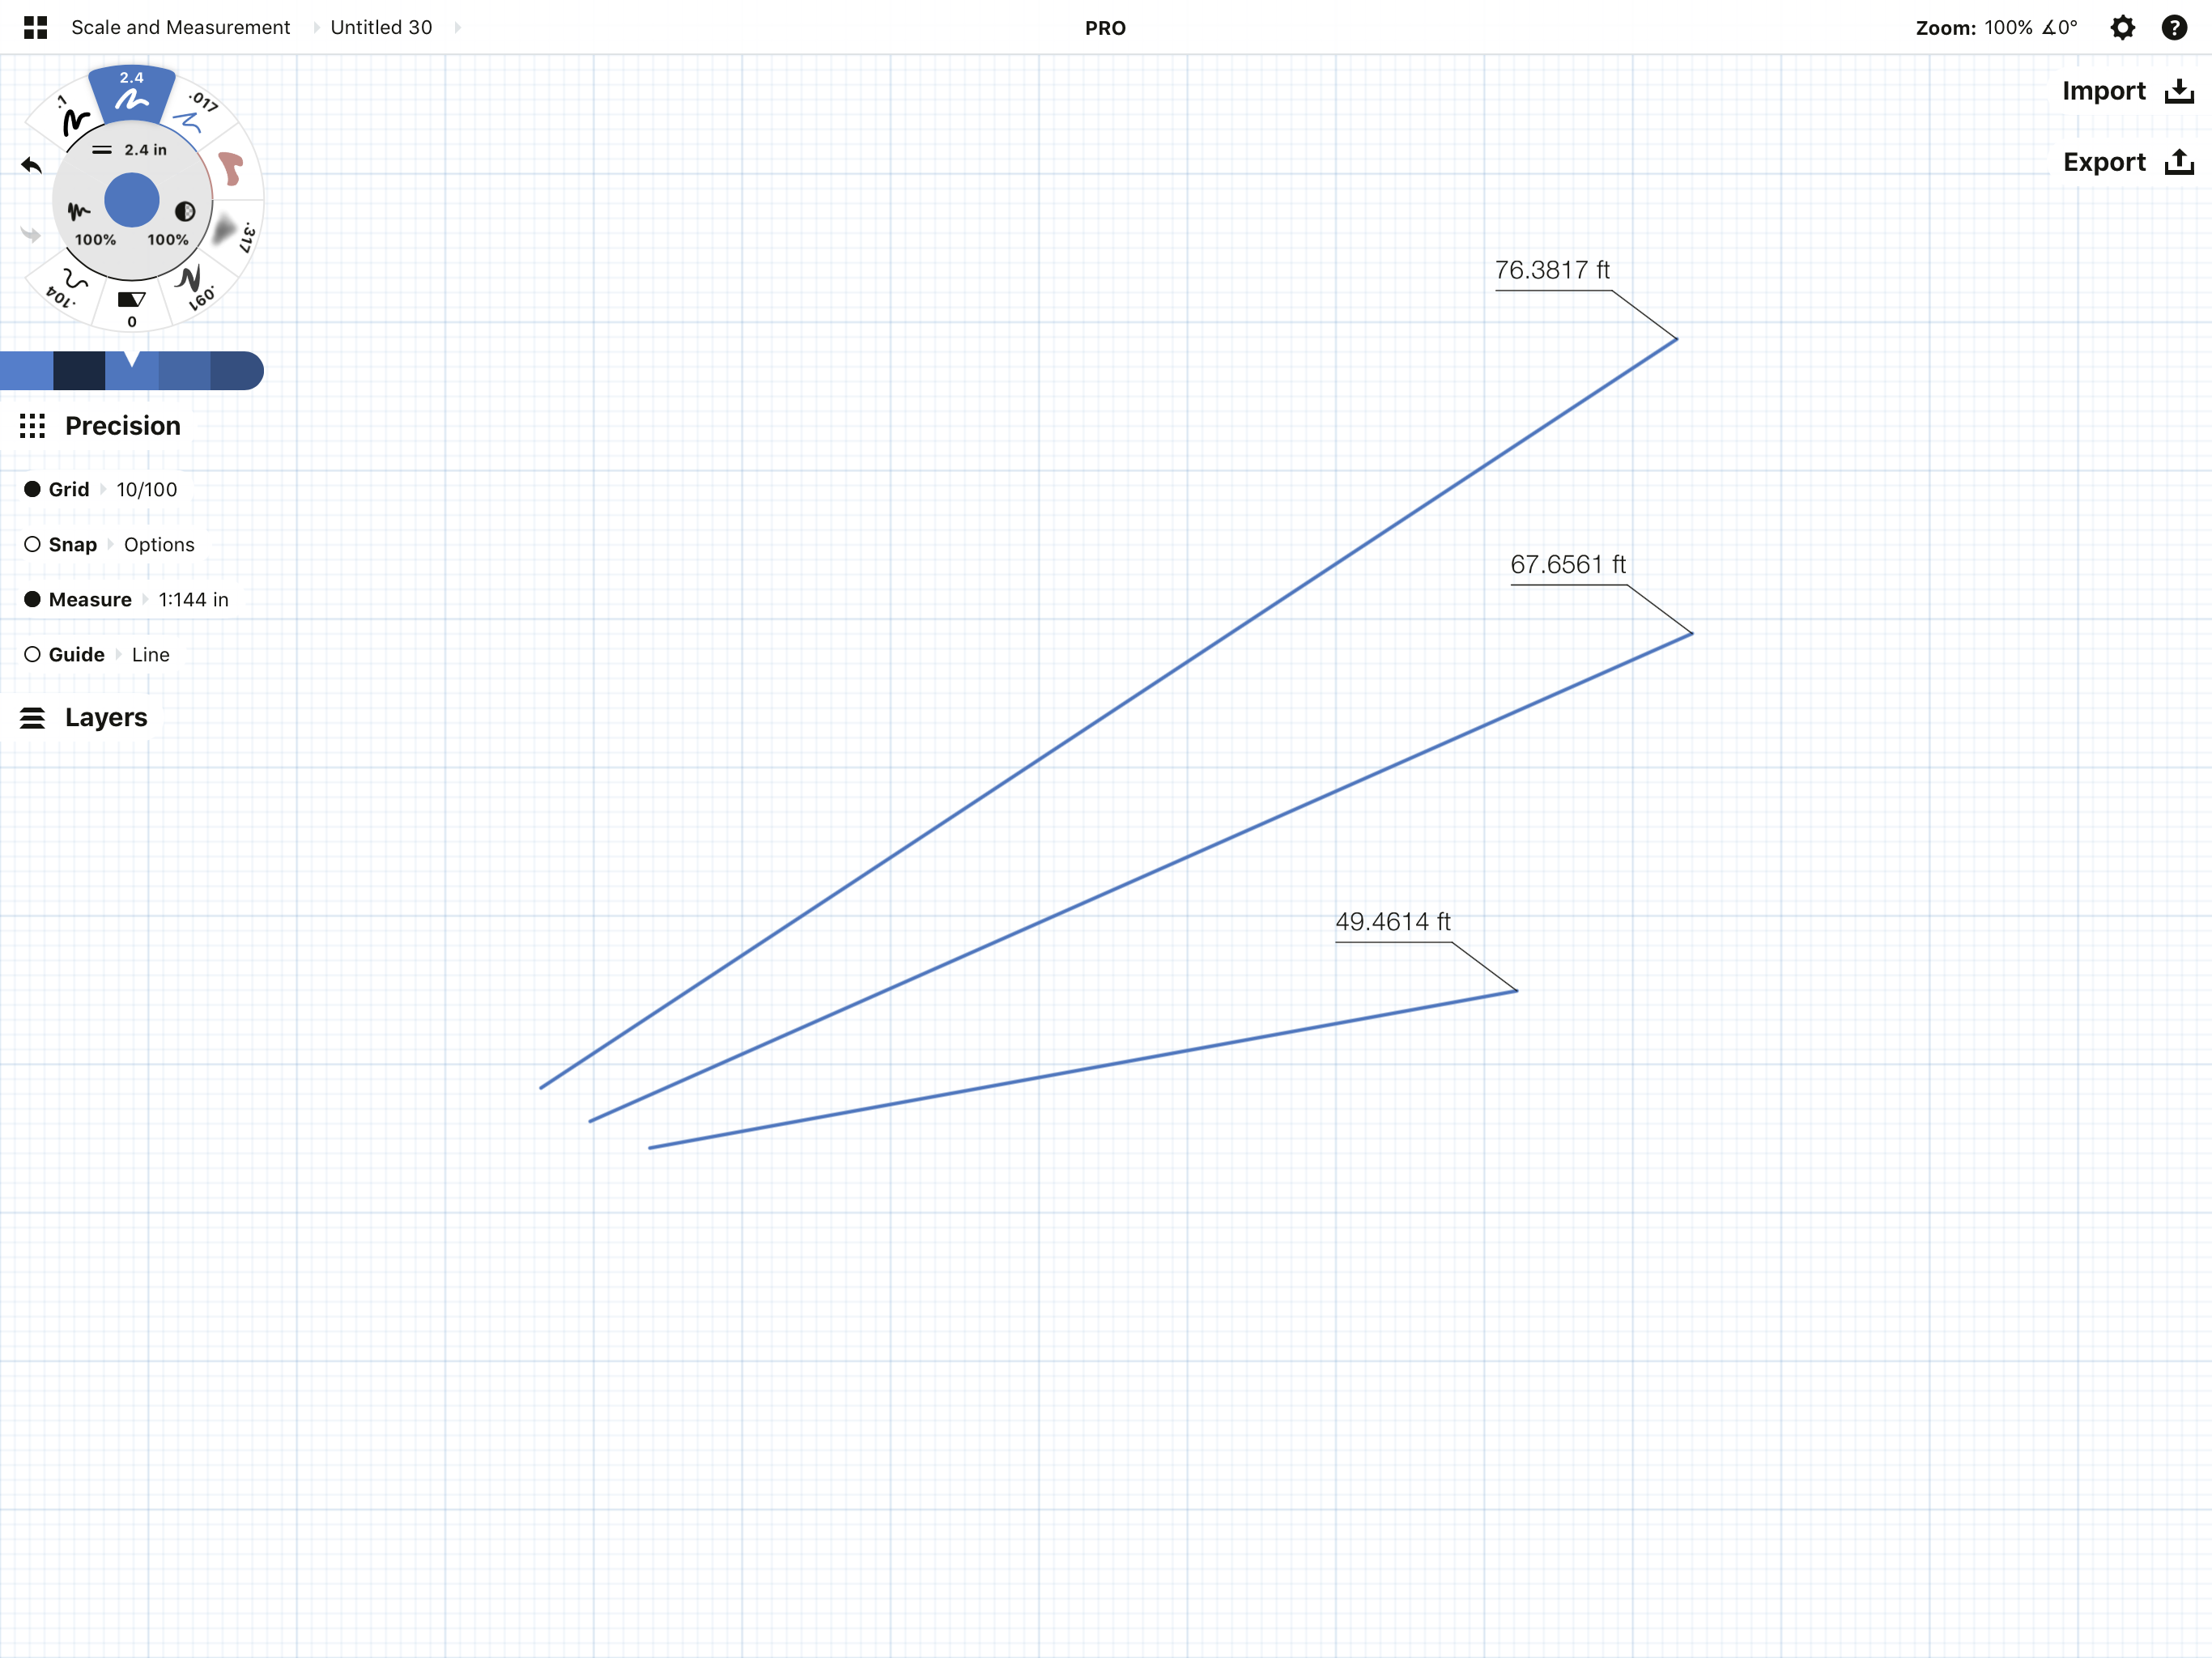
Depending on your desired outcome, you don’t need to trace the line. You can create a floating measurement tag by following the first four steps. These tags will remain on screen while Measure is active. Turn Measure off and they will disappear, turn it on and they will reappear.
To export a plan with tags in place, leave Measure on and they’ll show up in the final.
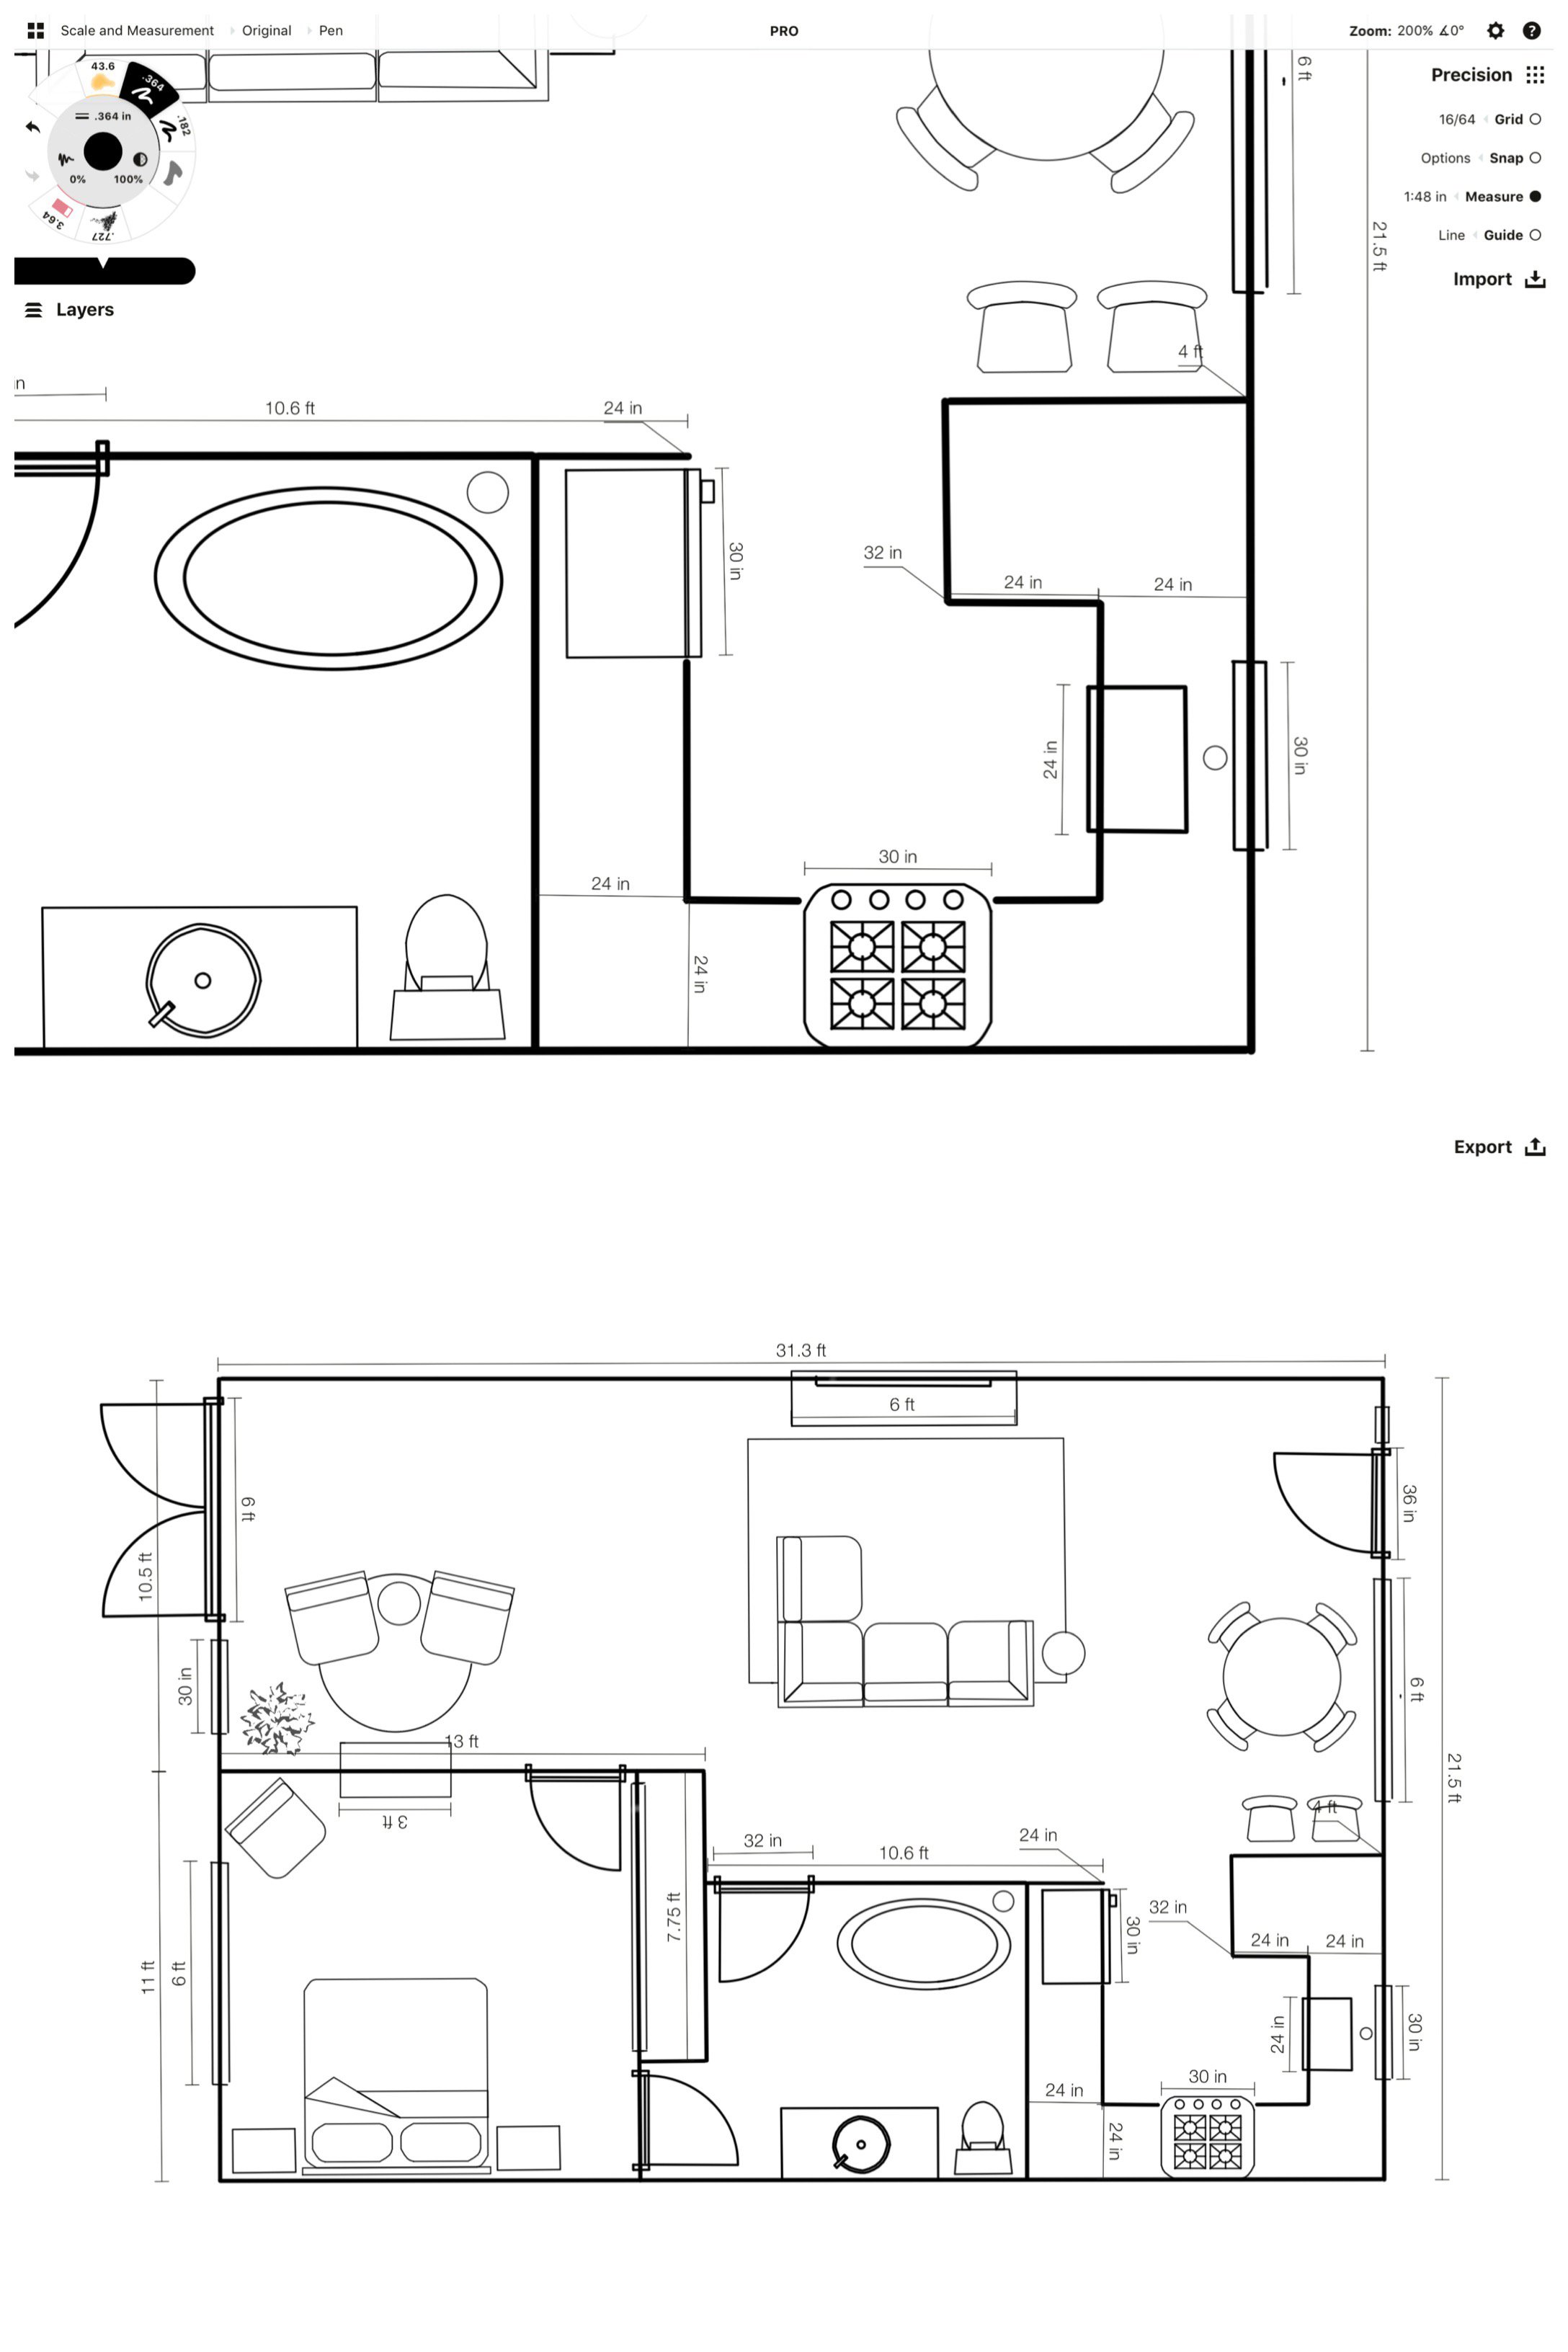
Example of a plan with floating measurements, and the exported version.
To rotate the guide an exact number of degrees, tap+hold the angle value in the status bar, and choose a rotation value from the shortcuts or enter in your own.
Tip: Set Scale to Off in the Selection menu so you don’t resize your line when moving it. Set Rotate to Off when setting angles.

To precisely rotate the Line guide: 1. Tap+hold the angle value on the status bar. 2. Choose a shortcut or enter your angle. 3. Keep rotate off while you adjust your line on the canvas.
A Few Useful Tool Tips
Duplicate, Mirror and Flip can make linework faster. If you already have a line in place with the measurement you want, select and duplicate it. You can select floating measurements with the Item Picker and duplicate those, as well.
Tap+hold the Angle value in the status bar to rotate a selected line an exact number of degrees.
Did you draw your line in the wrong place? Pick it up with the Lasso or Item Picker and move it to the right place. If you think it's right and someone else thinks it's wrong, try duplicating the layer and adjusting it there. Then pick which option you both like better.
Set your layers to Manual mode so you can draw in as many layers as you need regardless of tool. Keep your ideas and edits separate between layers so you can easily toggle among them (think client mark-ups vs electrical notes vs kitchen layouts vs flow diagrams).
4. Export the Plan
You’ll probably want to share your plan with interested parties for conversations and edits, and later on, hand the plan over to an engineering team.
- For quick comments, select part of your drawing, then tap+hold+drag it to your email or text where it will paste as a PNG.
- To share an editable drawing, export the plan as a native CPT file. This allows a client or teammate to open the file straight inside Concepts and add mark-ups. Hint: Rename a new layer with your client’s name and set the active tool to a red pen before exporting.
- To export a plan to a specific size for printing, create an artboard of that size under Settings -> Artboard Size, then select and scale your plan to fit the artboard. Be sure Scale, not Stretch, is active in the Selection menu; it also helps to set Rotate to Off. Tap Export, select your file type, and choose Custom Size.
- To export an editable file to CAD, Adobe (Creative Cloud account required) or other software, choose the appropriate file type and export. Note that files opened in other vector editors may not look the same - they don’t support the textured strokes Concepts specializes in, so stick with Fixed Width and Wire brushes and the Slice tool as your eraser if you’re going to edit elsewhere.
- To back up a drawing from the Gallery, tap+hold+drag the drawing to your Files or cloud. Add more drawings to your selection by tapping on them. To back up an entire project, open the project menu and tap+hold+drag the project to your Files or cloud.
Good luck creating your plans! If you have questions, please email us at concepts@tophatch.com and we’ll be happy to help.
By Erica Christensen
Recommended
How to Design in Concepts - Get started using Concepts' Shape Guides, Snap, Selection and Layers as you design a simple object.
Scale and Measurement in Concepts - Learn how to apply accurate scale and measurements to your drawings and plans.
The Design Life of a Paperless Architect - Architect Craig Burns shares his design workflow on iPad in our Architectural Design Q&A.